Giant Poinsettia for Christmas: Festive Foam Flower Tutorial
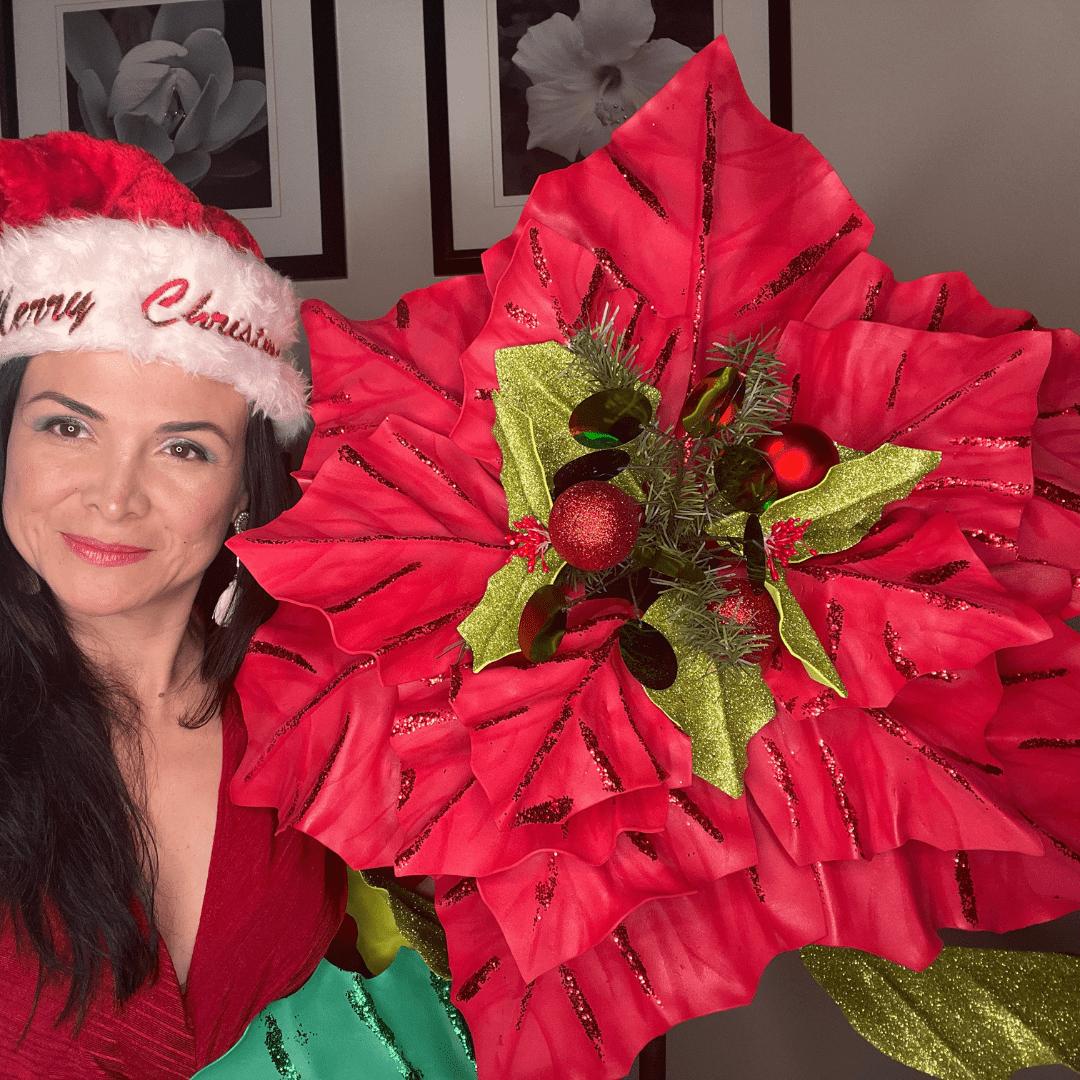
If you've been searching for a way to make your holiday decor genuinely stop-people-in-their-tracks stunning, a giant poinsettia Christmas foam flower is exactly what you need. We're talking 3-4 feet of bold, velvety red petals that look like they belong in a Dolce & Gabbana holiday window display — not a craft store clearance bin.
I've been making giant foam flowers for years, and every holiday season, the poinsettia is hands-down the most requested design I get. There's something about scaling up that iconic Christmas flower that just hits different. It's dramatic, it's festive, and honestly? It's way easier to make than you'd think.
In this tutorial, I'm walking you through everything — the materials, the petal shapes, the layering, the finishing touches that make it look professional. Whether you're decorating for a holiday party, a corporate event, or just want to make your living room feel like Christmas exploded in the best possible way, this one's for you.
Real talk? Fresh poinsettia plants are gorgeous, but they're also notoriously finicky. They drop leaves when it's too cold, they wilt near drafts, and a decent-sized one from a nursery runs you $25-$50 — and it'll look rough by New Year's.
A giant foam version? It lasts forever. You make it once, store it carefully, and pull it out every single year.
According to Statista, poinsettias account for roughly $250 million in sales during the holiday season in the US alone — making them the best-selling potted plant in the country. People are obsessed with this flower. So imagine showing up to a holiday party with a 3-foot foam version in deep crimson. You will be remembered.
Event planners especially love this. A single giant foam poinsettia can anchor an entire holiday vignette — next to a fireplace, flanking an entryway, or grouped into a full freestanding giant flower arrangement that transforms a venue.
And the cost comparison is wild. A professional florist charging for large-scale holiday floral installations can run $500-$2,000+ for a single focal piece, according to The Knot's floral pricing guides. A DIY giant foam poinsettia? You're looking at $30-$60 in materials, tops.
That math is hard to argue with.
Before we get into the fun part, let's talk supplies. Using the right materials makes an enormous difference — I learned this the hard way when I tried to use cheap craft foam early on and ended up with petals that looked like sad red placemats.
EVA foam is non-negotiable. It's flexible, heat-shapeable, lightweight, and takes paint beautifully. It's what we use in all our kits at Amazing Giant Flowers, and it's what I recommend every single time.
- EVA Foam Sheets (2mm for small petals, 4-6mm for large outer petals): The backbone of your flower. You want the thicker foam for the big structural bracts and thinner foam for the inner layers and the small yellow cyathia center. Red and green are your primary colors here.
- Heat Gun: This is how you get that gorgeous natural curve in each petal. Without it, your petals will lay flat and look stiff. Check out our full guide on heat gun techniques for shaping foam flower petals — it's a game changer.
- Sharp Craft Knife or Scissors: Precision matters with poinsettia petals. The pointed tips and subtle veining are what make it look real.
- Hot Glue Gun (high temp): Low-temp glue doesn't bond EVA foam reliably. Go high temp, work fast, and don't burn your fingers. (I say this from extensive personal experience.)
- Acrylic Paint in Deep Red, Burgundy, and Bright Yellow: Even if you start with red foam, a little paint adds depth and that rich poinsettia glow. A dry-brush of burgundy on the petal edges is everything.
- Bendable Pipe Stems or Floral Wire: For freestanding versions, you'll need a sturdy stem. We carry bendable pipe stems specifically sized for large-scale foam flowers in our shop.
- Green EVA Foam (2mm): For the leaf bracts that sit beneath the red petals — a detail most tutorials skip, and it's what separates a good poinsettia from a great one.
If you want to skip the supply-hunting headache, our Giant Flower Kits come with everything pre-cut and ready to assemble, including video tutorials. But if you're sourcing materials yourself, just make sure you're getting quality EVA foam — the density matters for how well it holds shape after heating.
Ok, this is where it gets really fun. I'm going to walk you through this in layers, because that's exactly how a real poinsettia grows — and mimicking that natural layered structure is what makes the foam version look so convincing.
A poinsettia has two distinct petal types: the large outer bracts (the showy red "petals" everyone recognizes) and the smaller inner bracts (more slender, slightly lighter in color). Then underneath everything, you have the true green leaves.
For a 3-foot finished flower, here's the sizing breakdown I use:
Trace your templates onto the foam with a chalk marker or light pencil — it wipes off clean. Cut slowly and deliberately. The pointed tips on poinsettia petals are what give it that instantly recognizable silhouette, so take your time there.
When I first started making giant flowers, I rushed the cutting stage constantly. Big mistake. A wobbly petal edge shows up immediately once everything is assembled.
This step is what separates a flat craft-project poinsettia from one that looks genuinely botanical. Poinsettia bracts have very visible center veins running from base to tip, with smaller branching veins on either side.
Use the back of your craft knife (not the blade) or a ballpoint pen with no ink to press a center vein line down each petal. Then add 4-6 smaller branching lines on each side. Press firmly — you want an actual indentation in the foam.
Now grab your heat gun. Hold it 6-8 inches from the foam surface and move it in slow passes. The foam will start to soften within seconds. While it's warm and pliable, curve the petal gently upward along the center vein — like a gentle U-shape when viewed from the base. Hold it in that position for 10-15 seconds while it cools.
For the outer bracts, I also like to add a slight backward curl at the very tip — just a small heat-and-bend move that makes the petal look like it's reaching outward naturally. It's a tiny detail that makes a huge visual difference.
Do this for every single petal. Yes, it takes a while. Put on a Christmas playlist and enjoy the process — this is the meditative part of foam flower making, and I genuinely love it.
Even if you started with red EVA foam, painting adds the dimension that makes it look real. A flat red poinsettia looks like a craft project. A shaded, multi-toned one looks like something you'd see in a Neiman Marcus window display.
Here's my painting approach for poinsettias:
Let everything dry completely before assembly. I know it's tempting to rush, but wet acrylic plus hot glue is a recipe for a smeared, messy mess. Ask me how I know.
Now we put it all together. This part goes faster than you'd expect once all your petals are prepped and dry.
Start with your green leaf bracts. Arrange them in a circle on your work surface, tips pointing outward, and hot glue them to a circular foam base disc (about 6-8 inches in diameter, cut from your EVA foam scraps). This base disc is what holds everything together and gives you a clean attachment point for the stem.
Next, layer in your large outer red bracts. Stagger them so they fall between the green leaves, not directly on top. Hot glue each one at the base, pressing firmly for a full 30 seconds while the glue sets.
Add your medium bracts in the next layer, again staggered. Then your small inner bracts, angled upward slightly more than the outer layers. The whole flower should start to look like it's blooming — dimensional and full, not flat.
For the cyathia center, cluster your small yellow circles together and glue them as a tight group in the very center. Real poinsettia cyathia are tiny and clustered, so don't spread them out — keep them dense and grouped. You can add tiny dots of orange or red paint on each circle for extra realism.
For a freestanding flower, push your bendable pipe stem through the base disc from underneath before you glue down your first petal layer. Secure it with a generous amount of hot glue and let it cure fully. For extra stability on a very large flower, I sometimes use two stems twisted together — it gives you a much sturdier base.
For a wall-mounted version, skip the stem and instead glue a sawtooth hanger or two loops of heavy ribbon to the back of the base disc. Our wall flower installation guide has great tips on mounting large foam pieces securely.
Now for the fun part — where do you put this gorgeous thing?
According to IBISWorld, the US floral and event decoration industry generates over $7.9 billion annually — and holiday decor is one of the biggest seasonal drivers. If you're an event planner or small business owner, investing in reusable giant foam flowers pays for itself incredibly fast compared to ordering fresh florals every season.
And if you want to go bigger — like a full holiday arch or a backdrop wall — check out our guide on how to make an oversized flower arch backdrop. Giant poinsettias mixed with white foam flowers and greenery make the most incredible Christmas arch you've ever seen.
A HGTV holiday decorating trends report noted that oversized, statement-making decor pieces are consistently among the top holiday decorating trends — people are moving away from tiny tchotchkes and toward fewer, bolder, more impactful pieces. A giant foam poinsettia is exactly that energy.
One last tip before I let you go: store your finished foam poinsettias carefully. Wrap them loosely in tissue paper and store in a large box — don't crush the petals. Stored properly, a well-made EVA foam flower lasts 5-10+ years. That's a lot of Christmases for a $40 materials investment.
I genuinely hope you make one of these this holiday season. Send me photos — I mean it. Nothing makes my day like seeing someone's finished giant poinsettia in their home or at their event. It's why I do this.
If you want to skip some of the cutting and get straight to the fun part, browse our Giant Flower Kits at Amazing Giant Flowers — we have holiday options that ship nationwide with everything you need. What are you decorating for this Christmas? I'd love to know.
Ready to Create Something Amazing?
Browse our collection of giant flower kits and start your next project.
Shop All Flowers