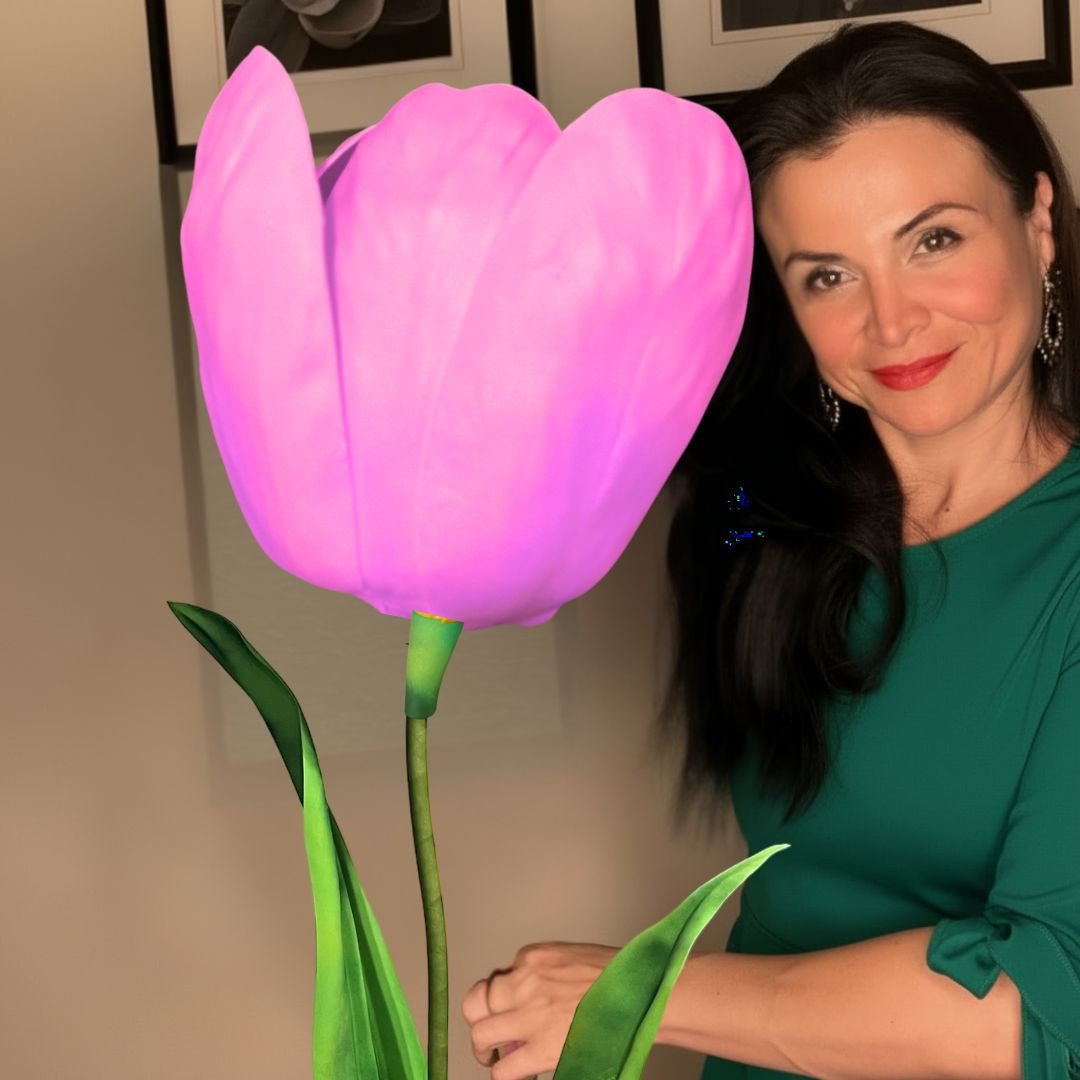
Giant Tulip DIY: Spring Decor That Blooms All Year
Key Takeaways
Real talk? A lot of people assume giant flowers are complicated. They see a lush peony or a ruffled ranunculus and think, "There's no way I can make that."
Tulips are different. The petal shape is clean and simple — an elongated oval with a slight point at the tip. There's no intricate fringe, no layered ruffles, no complicated center detail.
That simplicity is actually what makes them so striking at scale. When you blow a tulip up to 3 feet tall, that clean silhouette becomes genuinely dramatic.
According to Statista, tulips are consistently among the top three most popular cut flowers sold in the United States, right behind roses and chrysanthemums.
That popularity translates directly to decor. People recognize tulips instantly. They read as "spring," as "fresh," as "celebratory" — without you having to do any extra work to set the mood.
And from a purely practical standpoint, fewer petals means less cutting, less shaping, and less assembly time. A giant tulip can realistically be finished in 2 to 3 hours on your first attempt.
Compare that to a giant peony, which can take 5+ hours and involves dozens of individual petals. For beginners, tulips are the smart starting point.
I'm going to be straight with you — you don't need a craft room full of fancy tools to make this happen. Here's what I use and what I recommend.
If you want to skip the supply-hunting phase entirely, our Giant Flower Kits come with pre-cut EVA foam petals, a stem, and a video tutorial. They start at around $80 and honestly? They're the reason so many first-timers actually finish their flowers instead of abandoning them halfway through.
This is where a lot of people get tripped up. They make their petals too small and end up with something that looks like a regular-sized flower on a stick. Not the vibe we're going for.
For a finished tulip that stands 2.5 to 3 feet tall, here's the sizing breakdown I use:
Want something more dramatic? Scale everything up by 30 to 40 percent for a tulip that hits the 4-foot mark. These are absolute showstoppers for wedding arches and event backdrops.
Speaking of which — if you're building toward a larger installation, our post on Giant Flower Wedding Arches has a full breakdown of how to scale and cluster multiple flowers for maximum impact.
For wall-mounted tulips, you can go even larger since you don't have to worry about the stem supporting the weight. I've made wall tulips with petals up to 20 inches tall — they look absolutely unreal against a white wall.
Ok, this is where it gets really fun. The heat gun is the secret weapon that separates a flat, craft-store-looking flower from something that genuinely looks organic and dimensional.
Use your template (or pre-cut kit pieces) and cut all six petals before you start shaping. Working in batches keeps you consistent.
Hold your scissors at a slight angle as you cut the outer edge — this creates a naturally beveled edge that catches light beautifully once the flower is assembled.
Step 2 — Apply Heat to the Center of Each Petal
Hold your heat gun about 3 to 4 inches from the foam surface. Move it in a slow, steady oval pattern over the center of the petal.
You'll see the foam start to soften and slightly darken — that's your cue. It happens fast, usually within 8 to 12 seconds.
This is the move. The second the foam softens, press the petal over a rounded surface — a large ball, a bowl turned upside down, even your knee works in a pinch.
Hold it there for 10 to 15 seconds while it cools. EVA foam has memory — once it cools in that curved position, it holds the shape permanently.
Real tulip petals have a subtle outward flare at the tips. Replicate this by quickly running the heat gun along the top edge of each petal, then gently rolling the edge back with your fingers.
Don't overthink it. A little imperfection here actually makes the flower look more realistic, not less.
When I first started making giant flowers, I ruined so many petals by holding the heat gun too close for too long. The foam would bubble and warp in ways I couldn't fix. Now I know — distance and movement are everything. Keep that gun moving.
EVA foam takes acrylic paint beautifully. And this is where you get to make your tulip truly yours.
Choose a base color — think coral, fuchsia, soft yellow, classic red, or lavender — and apply two thin coats with a wide foam brush. Let the first coat dry completely before adding the second.
Thin your paint slightly with water for the first coat. This helps it sink into the foam texture rather than sitting on top and cracking.
Real tulips are almost never a flat single color. The base of the petal is usually deeper, and it lightens toward the tip — or vice versa.
To replicate this: apply your darker base color to the bottom third of each petal while the paint is still wet, then blend a lighter shade upward with a dry brush. Work quickly and don't overblend — you want to see the transition.
This is an optional step, but it adds so much realism. Using a fine liner brush and a slightly darker version of your base color, draw thin lines from the base of each petal upward toward the tip.
Keep them loose and slightly curved — not perfectly straight. Think of how veins actually look on a real petal and let your hand be a little imprecise.
For more detailed painting guidance on foam surfaces, I wrote a whole guide on painting on foam core that covers primer, sealant, and finish options in depth.
Alright, your petals are shaped and painted. Now comes the satisfying part — watching it all come together.
Start with your three inner petals. Apply a generous bead of hot glue along the bottom inch of each petal and press it firmly against the top of your pipe stem, spacing the petals evenly around the circumference.
Hold each one for a full 20 to 30 seconds. High-temp glue needs time to fully bond to foam — rushing this step is how you end up with petals that pop off mid-event.
Once your inner petals are set, position the three outer petals in the gaps between the inner ones. This alternating pattern is exactly how real tulips grow — it's not just aesthetic, it also creates a structurally stronger flower head.
Glue each outer petal so its base overlaps slightly with the inner petals beside it. This overlap is what gives the tulip its closed, cup-like silhouette.
Wrap your pipe stem from the base of the flower head down to the bottom with green floral tape, stretching it slightly as you go so it adheres to itself. This covers any visible glue and gives the stem a clean, finished look.
Attach your leaf pieces to the upper stem with a dab of hot glue, then wrap over the attachment point with more floral tape to secure.
And just like that — you have a giant tulip. Seriously. Stand it up, step back, and take a moment. You made that.
Making the flower is one thing. Styling it well is what takes a craft project to a genuine decor moment. Here are my favorite ways to display giant tulips.
Make 5 to 7 tulips in varying heights — some at 24 inches, some at 36 inches, one or two at 42 inches — and group them together in a large vase or weighted bucket. Vary the colors slightly: three in soft pink, two in coral, two in white.
This mimics how tulips actually grow in a garden and creates a display that looks intentional and lush rather than sparse.
Remove the stems and mount the flower heads directly to a foam board or wood panel using Command strips or small L-brackets. Arrange them in a loose, organic cluster — not a perfect grid.
Add a few leaves and some trailing greenery (faux vines work great) to fill the negative space. This makes a stunning backdrop for photos, a nursery wall accent, or a spring-themed retail display.
For more wall display inspiration, our guide on wall decor paper flowers has some gorgeous layout ideas you can adapt for foam tulips.
Event Entrance Installations
Line a ceremony aisle or event entrance with giant tulips in tall weighted bases. Space them every 3 to 4 feet on alternating sides. For a spring wedding or baby shower, this creates an entrance that feels genuinely magical.
We have a whole collection of baby shower backdrop ideas and giant flower centerpiece ideas if you're planning a full event installation.
Combine your giant tulips with other foam flower varieties — oversized poppies, simple daisies, or big blooming peonies — for a mixed garden backdrop. This is one of the most requested looks for spring events right now.
If you want to go big with a full backdrop build, check out our tutorial on DIY giant flower backdrops for photos.
I love fresh flowers. I genuinely do. But for large-scale decor, the math just doesn't work in their favor. Here's the honest breakdown.
According to a Brides.com survey, couples spend an average of $2,000 to $2,500 on wedding flowers — and that's for standard-sized arrangements. Large-scale floral installations can push that number to $5,000 or more.
A set of 10 to 12 giant foam tulips from our bundle kits runs between $350 and $600 — and you keep them forever.
According to IBISWorld, the US floral industry is valued at approximately $7.9 billion — but a growing segment of that market is shifting toward permanent and artificial botanicals, especially for events and commercial decor.
The trend is real. People want the look of flowers without the wilting, the cost, and the logistical headache.
I've made every single one of these mistakes so you don't have to. Learn from my early disasters.
For a first-timer, plan on 2 to 3 hours from start to finish — including cutting, shaping, painting, and assembly. Once you've made one or two, you can knock out a giant tulip in about 60 to 90 minutes. The shaping and painting steps are where most of the time goes.
Using a pre-cut kit from Amazing Giant Flowers cuts your prep time significantly since the petals are already cut to the right dimensions.
6mm EVA foam is the sweet spot for most giant tulip builds. It's thick enough to hold a curved shape after heat forming, but pliable enough to manipulate easily. For very large tulips (petals over 16 inches tall), you might step up to 8mm for extra structural support.
Avoid anything under 4mm for petals — it's too floppy and won't maintain its shape over time.
Can giant foam tulips be used outdoors?
EVA foam is water-resistant, which is great news. However, prolonged UV exposure will eventually cause color fading, and extreme heat (like a car trunk in August) can soften the foam and distort the petal shapes. For outdoor use, I recommend applying a UV-resistant sealant spray over your painted petals and keeping them out of direct midday sun when possible.
For short-term outdoor events like garden parties or outdoor weddings, they hold up beautifully. Just bring them in at the end of the day.
Storage is one of the biggest advantages of foam over fresh florals. Store your giant tulips upright in a tall bin or box, or hang them from a hook in a closet. Avoid stacking heavy items on top of the petals — they can get compressed and lose their curve.
A cool, dry space away from direct sunlight is ideal. Many of my customers have flowers they've been using for 3 to 5 years that still look gorgeous.
Technically yes, but it's much harder. Some crafters use a hair dryer on the highest heat setting to soften EVA foam — it works, but it takes significantly longer and the heat isn't as concentrated, so your shaping control is limited.
A basic heat gun costs around $20 to $30 at any hardware store and is genuinely worth the investment if you plan to make more than one or two flowers. It's the single tool that makes the biggest difference in your results.
What colors work best for giant tulip spring decor?
For classic giant tulip foam flower spring decor, you really can't go wrong with soft pink, coral, white, lavender, and buttery yellow. These read as fresh and seasonal without being too literal. For a more dramatic, editorial look, try deep burgundy, burnt orange, or even black — giant tulips in unexpected colors are seriously stunning.
According to Pantone, warm peachy-coral tones and soft botanical greens are among the most influential color directions for 2025 — both of which translate beautifully into a giant foam tulip palette.
There's something genuinely special about making a flower that's bigger than your head and watching it transform a space. Giant tulips have this way of making people smile — they're familiar enough to feel comforting, but at that scale they become something completely unexpected.
If you're ready to jump in, head over to our shop at Amazing Giant Flowers and grab a kit — everything you need is already there waiting for you. And if you make one, I want to see it. Tag us. Send a photo. Seriously, nothing makes my day like seeing what you all create.
📺 Watch our step-by-step tutorial: How to Make a Giant Dutch Tulip
Ready to Create Something Amazing?
Browse our collection of giant flower kits and start your next project.
Shop All Flowers