Master How to Make Paper Flowers Like a Pro

You’re probably here because the usual paper flower tutorials are not solving the problem you face.
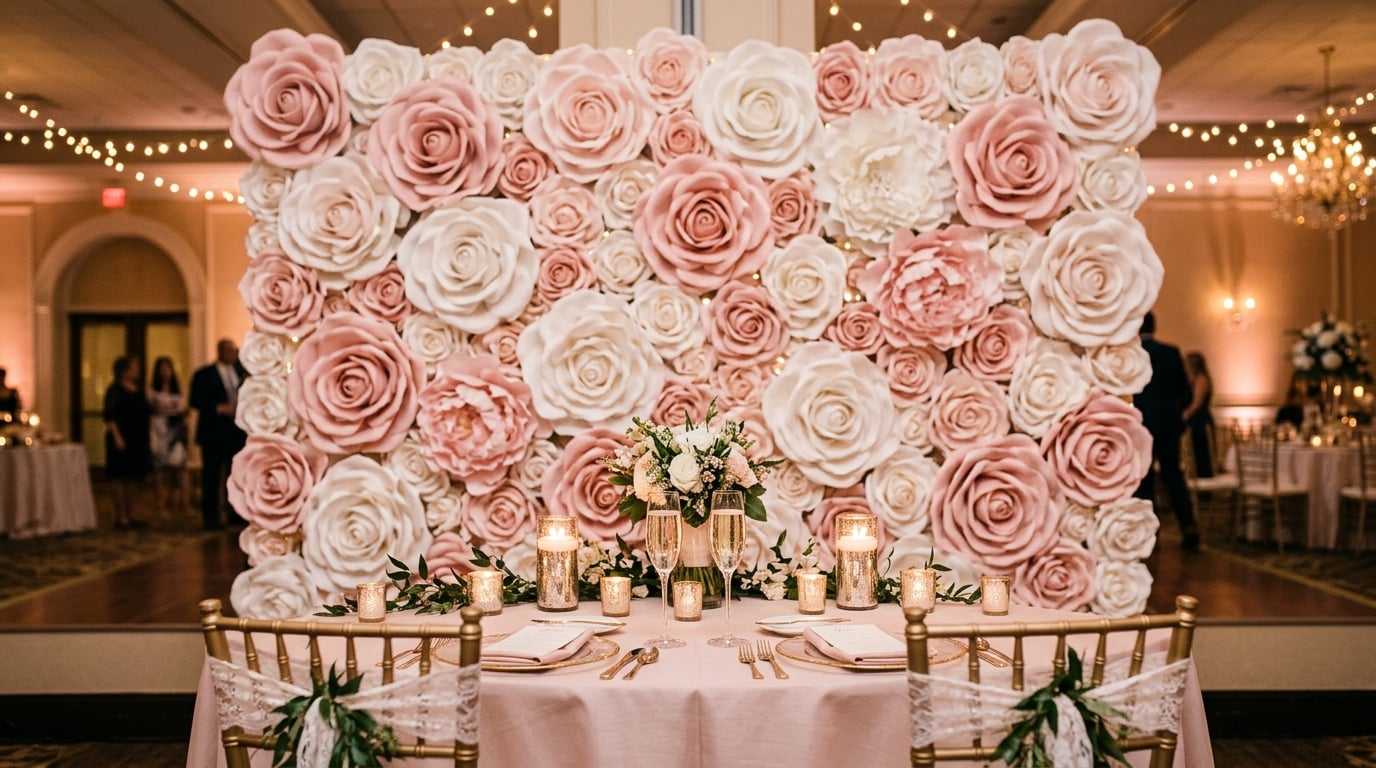
Maybe you need a bouquet that looks polished instead of homemade. Maybe you need a flower wall that fills a venue without collapsing halfway through setup. Maybe you are styling a wedding, a retail display, or a branded backdrop and real florals are too fragile, too expensive, or too limiting on color.
That is where paper floristry becomes more than a craft. It becomes a design skill.
I’ve seen the same frustration over and over. Beginners get stuck with floppy petals, visible glue, and flowers that look flat. Experienced makers hit a different wall. They can make a pretty bloom in their hand, but scaling that bloom into an event piece is a completely different discipline. The paper, the base, the shaping, and the mounting all change when the flower has to survive transport, handling, lighting, and guests taking photos next to it.
Learning how to make paper flowers well solves several problems at once. You get full control over size, color, timing, and style. You can match a brand palette. You can build out-of-season flowers. You can create install pieces that stay camera-ready long after fresh flowers would fade.
Beyond the Basics Your Journey into Paper Floristry
A good paper flower is not just decoration. It is a practical answer to real event and styling problems.
Wedding planners need statement pieces that stay beautiful all day. Visual merchandisers need display elements that can be color matched and reused. DIY crafters want something more elevated than a quick cardstock bloom taped to a wall. Paper flowers meet all three needs when they are built with the right methods.

The category itself is not niche. The global handmade paper decorations market was valued at USD 1.5 billion in 2023 and is projected to reach USD 2.5 billion by 2032, with paper flowers making up about 28.6% of total revenues, according to Dataintelo’s handmade paper decorations market report. That growth is tied to demand for sustainable products and personalized decor.
Real flowers are beautiful, but they come with limits.
Paper changes that.
With paper, you can build a rose in blush, rust, ivory, or a branded color that does not exist in nature. You can make one bloom for a gift or dozens for a large backdrop. You can store pieces, repair them, and bring them back out for another event.
Many individuals begin with small flowers because they are less intimidating. That makes sense. Significant progress occurs when you stop thinking only about petals and start thinking about purpose.
Ask these questions before you cut anything:
A flower that looks great on a craft table can fail instantly at an event. Build for the final environment, not just for the tutorial photo.
That mindset removes a lot of wasted effort. It also makes the process more satisfying, because every decision has a reason behind it.
Buying random supplies is one of the fastest ways to make paper flowers harder than they need to be.
The right toolkit does not have to be huge, but it does need to be intentional. Paper choice affects shaping. Blade quality affects edge finish. Glue choice affects both assembly speed and durability. If your flowers keep looking stiff or messy, the issue is often the toolkit, not your skill.

The paper craft audience is deep and skilled. 36.5 million Americans participated in paper crafting in 2016, and 86% of paper crafters had intermediate to advanced skills, according to Anthony Thomas’ paper crafter demographics overview. That tells you something useful. Better tools are worth it because the craft rewards precision.
Not every flower should start with the same paper.
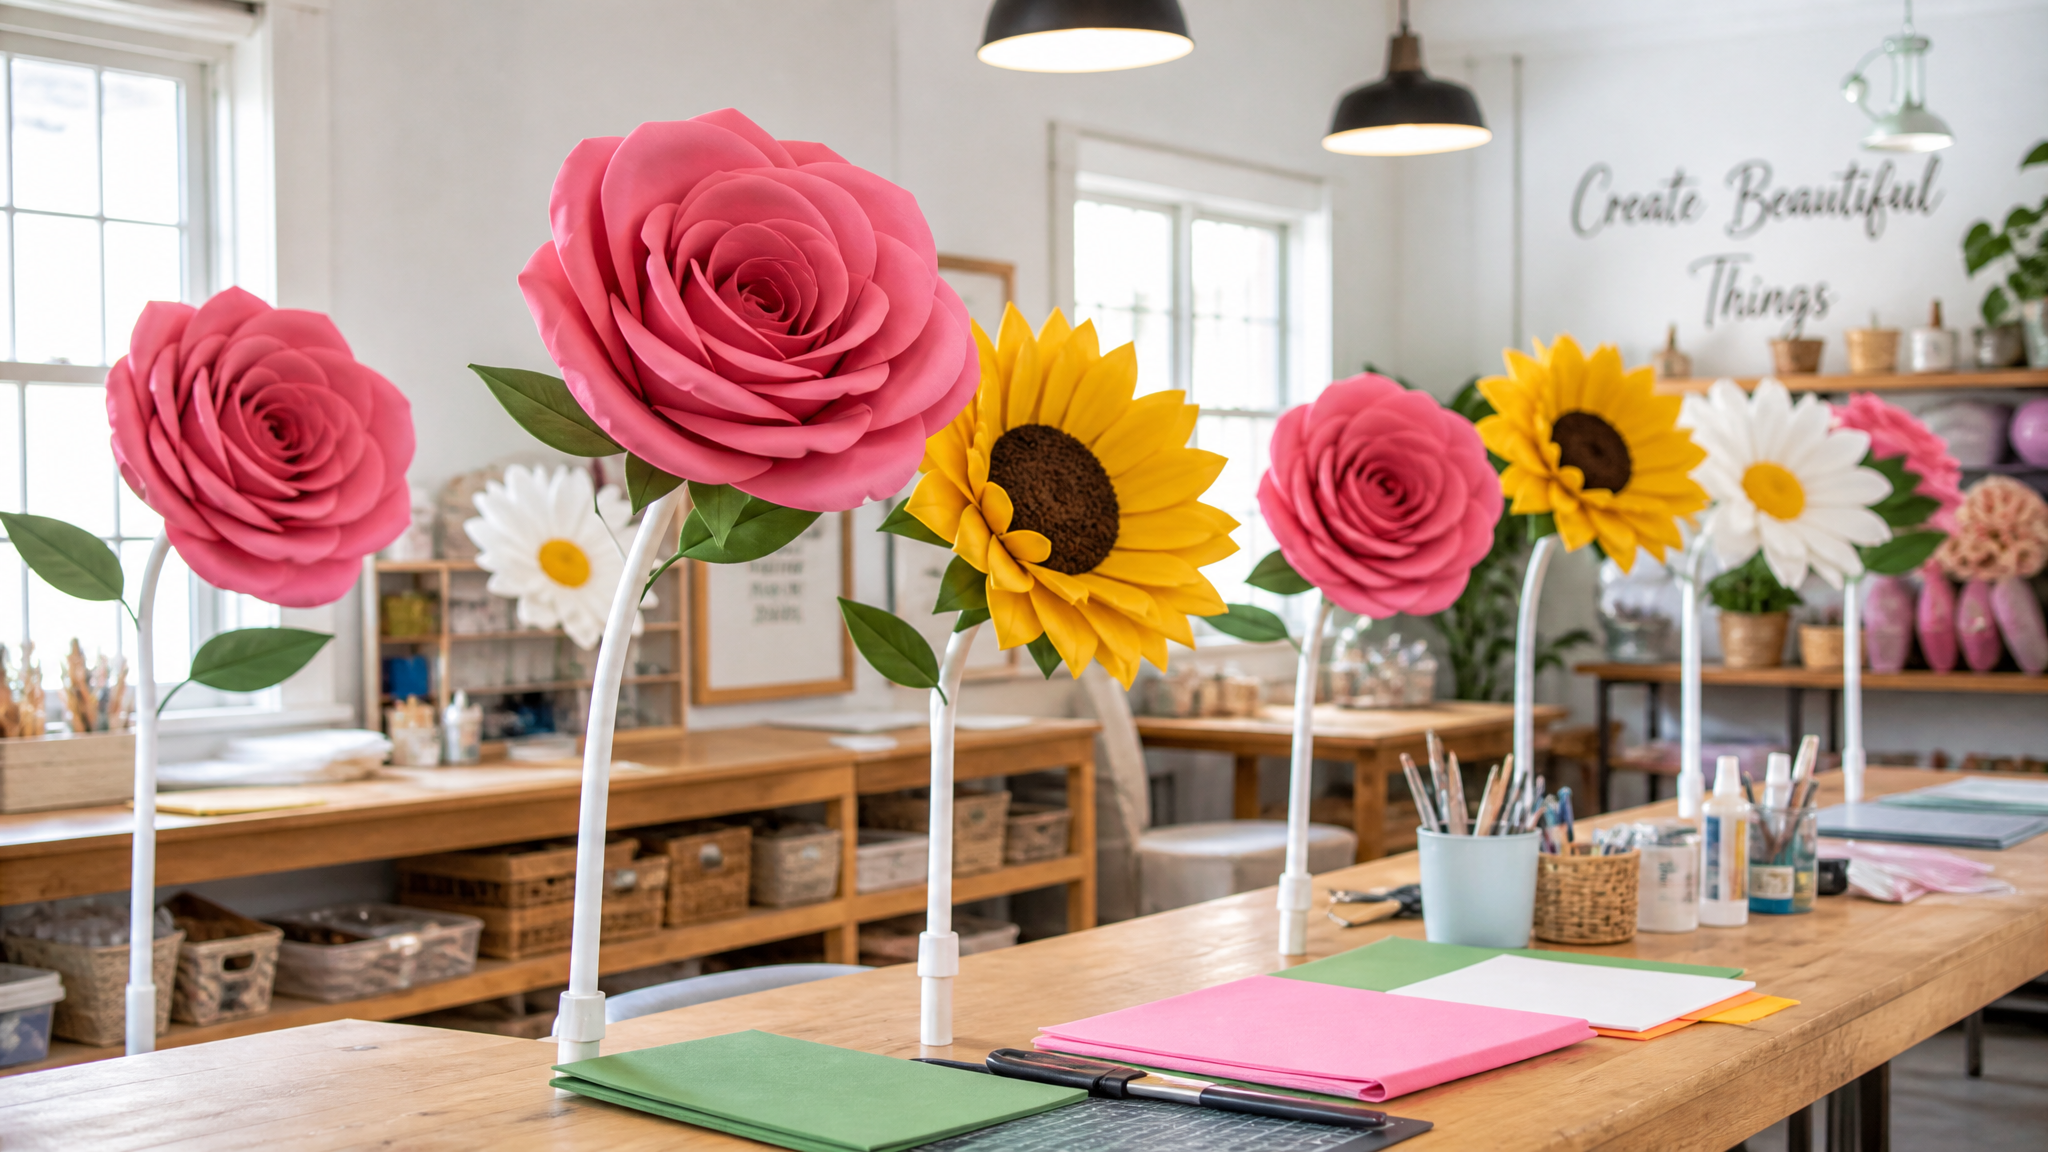
For small realistic flowers, I reach for crepe first. For sharp layered petals with a clean modern look, cardstock is useful. For large display work, EVA foam earns its place because it handles scale better and gives you a sturdier finished form.
You do not need every gadget sold in the craft aisle. You do need a few reliable basics.
Templates and cutting support tools save more frustration than people expect.
If you use a cutting machine, beginner-friendly projects can help you get comfortable with scale, clean cuts, and layered builds. This roundup of Cricut projects for beginners is useful if you want to move from hand-cut trial pieces into more repeatable flower work.
A few smart buying decisions also help:
If your cuts are ragged, your petals will never look expensive. Most “bad flower” problems start before assembly.
If you want a faster decision, use this:
The toolkit should match the outcome. That sounds obvious, but it is the difference between enjoying the process and fighting every step.
A bride wants a handheld bouquet that reads soft and natural in close-up. An event planner wants a ten-foot flower wall that still looks clean after setup, transport, and a full night of guests brushing past it. Both jobs rely on the same core skills. The difference is how you shape, support, and choose materials.
These four flowers teach the mechanics I come back to constantly at Amazing Giant Flowers. Roses train your eye for structure. Peonies teach controlled fullness. Sunflowers teach contrast and visibility from a distance. Anemones teach restraint, which is harder than many beginners expect.

Cutting gets you parts. Shaping gives those parts life.
For crepe flowers, cupping is one of the first skills to get under your hands. Press a small or medium stylus into a padded mat and work from the center outward so the petal forms a shallow bowl. Add pleating with a light zigzag motion between your fingers when the flower needs movement, especially on peonies and garden-style roses.
Color also needs restraint. Light moisture can soften harsh transitions if you tint or blend edges, but too much water weakens paper and creates warped petals that never sit cleanly. The Posey Box guide to basic paper flower techniques gives a solid reference for those foundational shaping methods.
Before cutting a rose, study finished examples with intention. These examples of paper rose flower styles show how petal width, center size, and edge curl change the character of the bloom.
The rose exposes weak construction fast. A loose center, flat petals, or repeated shapes will show immediately.
Cut a true petal family.
Use at least three sizes. Keep the inner petals narrow and slightly taller. Make the outer petals wider, softer, and less uniform.
Start with a compact center.
Form a bud with one petal, then wrap two or three more around it with a snug base. If the center starts bulky, the whole flower will stay bulky.
Cup the middle petals lightly.
Press from the center toward the edges. Roses usually need a gentle curve, not a deep bowl.
Curl only the top edge.
Use a pencil, dowel, or stylus. Too much curl makes the flower read stage-prop instead of botanical.
Place petals in a rotating pattern.
Offset each petal as you glue so the bloom develops a natural spiral.
Let the outer petals open.
The final ring should relax outward. That is what gives the rose maturity.
What works: slight irregularity, a tight center, and outer petals that open at different angles.
What fails: repeating one petal shape all the way around and gluing each layer flat to the previous one.
For event work, I often switch from paper to EVA foam for oversized roses because it handles transport and repeated installation better. The trade-off is realism. Foam gives you durability and cleaner large-scale curves, while fine crepe gives you a more natural petal surface at handheld size.
Peonies reward abundance, but they still need control.
A good peony feels full in the center and generous at the edge. A bad one turns into a round ruffle with no internal shape. The fix is simple. Keep the inner petals shorter, tighter, and closer together, then let the outer layers loosen gradually.
Peonies are forgiving in one way. Slight variation helps them. If every petal matches perfectly, the flower usually loses the loose luxury people expect from a peony.
Sunflowers earn their place in backdrops because they read clearly from across a room.
The shape is simple, but the center and petal direction matter. If both are flat, the flower looks like a cutout. If the center has texture and the petals angle forward with intention, it wakes up immediately.
One inner row and one outer row usually works best. More than that starts pushing the flower toward dahlia territory, which can be useful for decor, but it changes the identity of the bloom.
Anemones are clean, graphic flowers. They suit modern weddings, editorial styling, and installations where color contrast needs to carry the design.
Their strength is restraint. Broad petals, a dark center, and open spacing do most of the work.
Cut broad open petals.
Keep them airy and slightly rounded.
Shape with a light hand.
A shallow cup near the base is enough. Heavy ruffling fights the form.
Build a strong dark center.
Use a circular center backed by fringe or tightly clustered detail pieces.
Use fewer petals than feels safe.
Space is part of the design.
Clean up the back.
On wall-mounted flowers, a messy backing shows quickly on a simple bloom like an anemone.
This section pairs well with a visual walkthrough if you want to see shaping and layering in motion.
These four flowers build the hand skills behind polished bouquets and the structural judgment needed for large event pieces. Learn them well, and scaling up becomes much easier.
A bride approves a sample bouquet in the studio, then asks for the same flower at four feet wide for the ceremony wall. That is the moment paper floristry stops being a craft exercise and becomes build planning.
Small blooms train your eye and your hands. Large blooms test your structure, material choices, and installation judgment. I see the same frustration again and again at Amazing Giant Flowers. A flower looks beautiful on the table, then sags on the wall, twists on a stem, or crushes during transport because it was enlarged without changing the build.

Professional scale calls for different decisions. Handheld flowers can get away with lighter paper and simpler backs. Event flowers cannot. Once a bloom needs to survive setup crews, venue heat, photo lighting, and guest traffic, the material and the mechanics matter as much as the petal shape.
What changes at large scale
Start with the flower's job.
A centerpiece bloom only needs to look good from a few angles and survive one placement. A backdrop flower may need to read from across a room, photograph well up close, stay secure for hours, and come off the wall without tearing apart. That is why I scale designs by function first, not by template percentage.
Four parts usually need adjustment:
Use a test build before cutting a full production set. This saves hours.
Do not assume a small petal shape will stay graceful at double or triple size. Narrow petals often look elegant in a bouquet but feel weak in a giant bloom. Wide petals can hold shape better, but they also add weight fast.
I test one outer petal and one inner petal first. If the outer petal droops before assembly is finished, the issue is usually the material or the cut shape, not your technique.
2. Build a stronger core than you think you need
The center carries the flower. If the center flexes, the whole bloom reads as tired.
For paper flowers, a thick backing circle and clean layer placement usually handle wall work well. For repeat-use installs, large freestanding pieces, or venues where flowers will be packed and repacked, EVA foam is often the better choice. It costs more and takes a different shaping approach, but it holds form better, resists moisture, and handles event wear far better than basic craft paper.
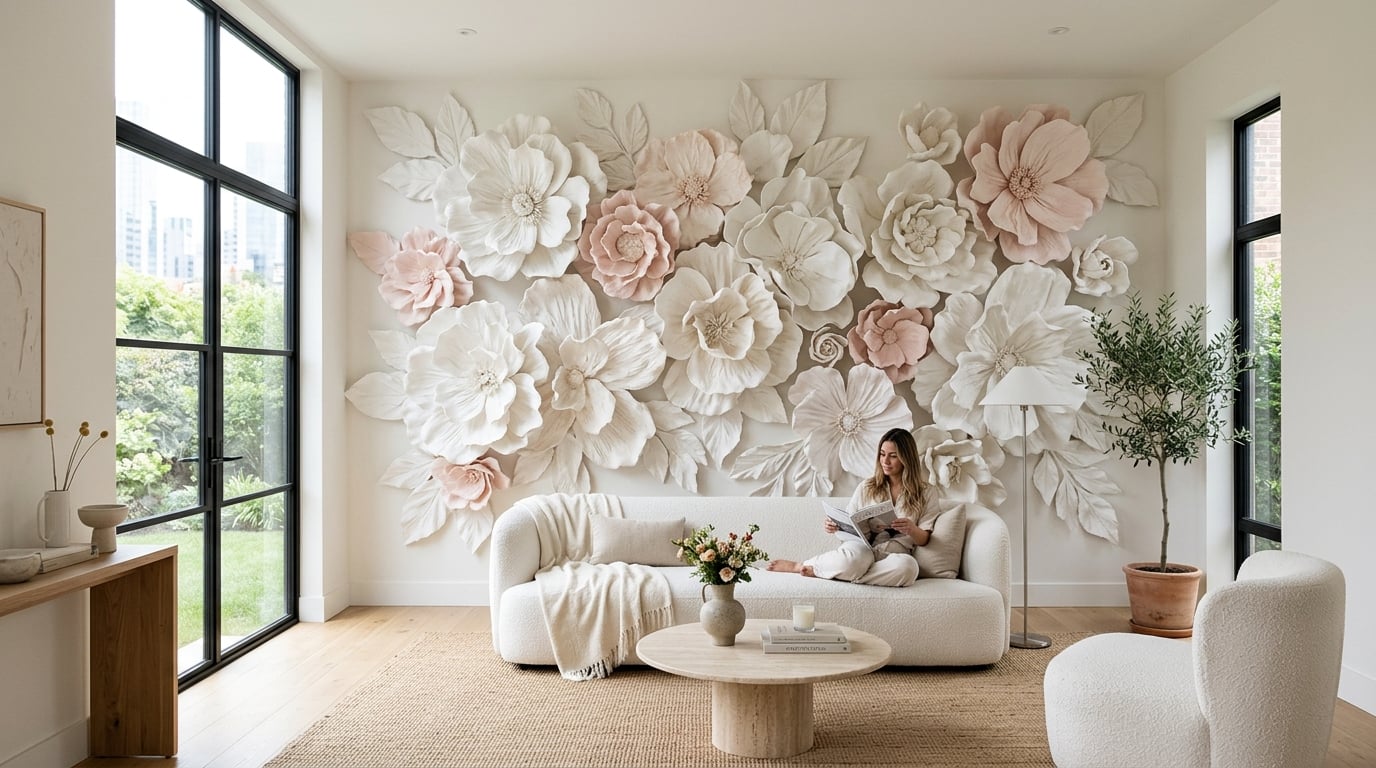
A lot of oversized flowers fail because they are wide and flat. From the floor, they look like discs with edges.
Give outer petals more lift. Keep inner petals tighter. Let the flower project outward so it casts a little shadow and reads clearly in photos. That depth is what separates hobby-style giant flowers from event work that feels dimensional.
Different settings reward different materials.
For inspiration on how large blooms change a room, these examples of paper flower backdrops show how much scale affects the finished event space.
If a giant flower looks floppy, check the base, paper weight, and mounting plan first. The petal edge is rarely the problem.
Mistakes that create rework
These problems show up constantly in large installs:
That last mistake is expensive. Once flowers are on the wall or frame, every fix takes longer and looks worse.
If you prepare mockups for clients or test colorways before production, the ShortGenius AI photo editor can help clean up process photos so the client focuses on scale, silhouette, and placement instead of table clutter or glue strings.
Large-scale paper floristry asks for craft skill and production thinking at the same time. Handle both, and the jump from bouquet work to backdrops gets much smoother.
Setup day exposes every shortcut.
I have seen beautifully shaped flowers lose their impact the moment they go under venue lighting or get lifted onto a backdrop frame. The petals were fine. The finish was flat, the backs were messy, or the mounting method was chosen too late. That is the gap between hobby results and client-ready work, especially once you move into event work, retail displays, and oversized flowers that need to survive transport, handling, and long install hours.
Finish for close viewing and event lighting
Guests do not view paper flowers the way makers do at the worktable. They see them from below, from the side, through phone cameras, and under harsh uplighting. A flower that looked complete in the studio can read unfinished fast.
Focus on the details that hold up in real conditions:
If you create client mockups or proposal visuals, the ShortGenius AI photo editor helps clean process images so attention stays on proportion, palette, and placement instead of studio clutter.
The right mount depends on where the flower will live and how much contact it will take.
A wedding backdrop usually needs speed, flexibility, and a clean front view. I group flowers by size first, then mount the visual anchors before adding transition blooms and foliage. That prevents the common problem of filling space randomly and ending up with weak focal points.
Retail and branded displays need tougher planning. Guests brush against petals. Staff may move pieces during resets. For that kind of work, EVA foam often earns its keep because it handles repeat use and incidental contact better than delicate paper. It is not always the prettiest choice for fine petal detail, but it saves a lot of repair time.
Freestanding flowers demand the most discipline. The support has to be solved at the core, where the bloom connects to the stem, stand, or base plate. If that joint flexes, the flower will twist, droop, or tear no matter how polished the petals look.
Protecting flowers so they can work again
Reuse matters for event planners and serious makers. A flower that looks perfect once but collapses in storage is expensive.
Protection starts with material choice, then surface treatment. Paper flowers for dry indoor use may only need careful packing and a clean finish. Flowers headed near entrances, humid rooms, or extended display periods benefit from sealing. For a practical option, this guide to Mod Podge clear acrylic sealer for paper flowers is useful when you want extra protection without rebuilding the flower from scratch.
Seal before final packing, not on install day. Wet or tacky surfaces attract lint, flatten shaping, and slow the crew down.
Professional finishing is a review process, not a last glance.
The goal is simple. The flower should look as strong in the venue as it did on the table where you built it.
A lot of makers reach the same point. The flower looks beautiful on the worktable, then falls apart under venue lights, transport pressure, or repeated use. That gap between a nice craft project and reliable event floristry is where standards matter.
At Amazing Giant Flowers, I see this shift happen when makers stop treating every bloom as a one-off and start building systems. The questions change. Which material will hold shape for six hours on site. Which petal pattern can be resized without losing proportion. Which flower can be packed, reopened, and installed by a crew that did not build it. Those are professional questions, and they lead to better flowers.
Where to grow from here
Choose your next practice goal based on the work you want to produce.
Skill grows faster when the practice matches the job.
The makers who improve fastest usually get strong at a short list of repeatable skills:
Those skills carry from bouquets to backdrops. They also reduce waste, which matters once you are building for clients, large installs, or seasonal displays.
If you are ready to move into larger statement pieces, this tutorial on giant paper flower DIY is a strong next step because it teaches the shift from small decorative blooms to flowers designed for visual impact across a room.
Serious progress usually comes from narrowing the challenge.
Build one rose until the center sits tight and elegant. Build one peony until the layers open fully without looking crowded. Build one sunflower until the face reads clearly from across the venue. Then increase the size, change the material, or adapt the design for an installation wall.
That is how dependable floral artistry develops. A handheld bloom teaches precision. A giant flower teaches structure, weight, and attachment. Learning both gives you range, which event planners and serious makers need.
You do not need dozens of new templates. You need methods that hold up in real use, materials that match the job, and enough repetition to spot problems before they reach the venue.
If you want professionally designed kits, large-scale flower inspiration, and resources for everything from handheld blooms to event-ready installations, visit Amazing Giant Flowers.
Ready to Create Something Amazing?
Browse our collection of giant flower kits and start your next project today.