DIY Large Paper Flower Wall for Photo Booth

You’re probably here because the event needs one strong visual anchor. Not more décor. Not another detail to manage. One backdrop that gets guests to stop, smile, and take photos.
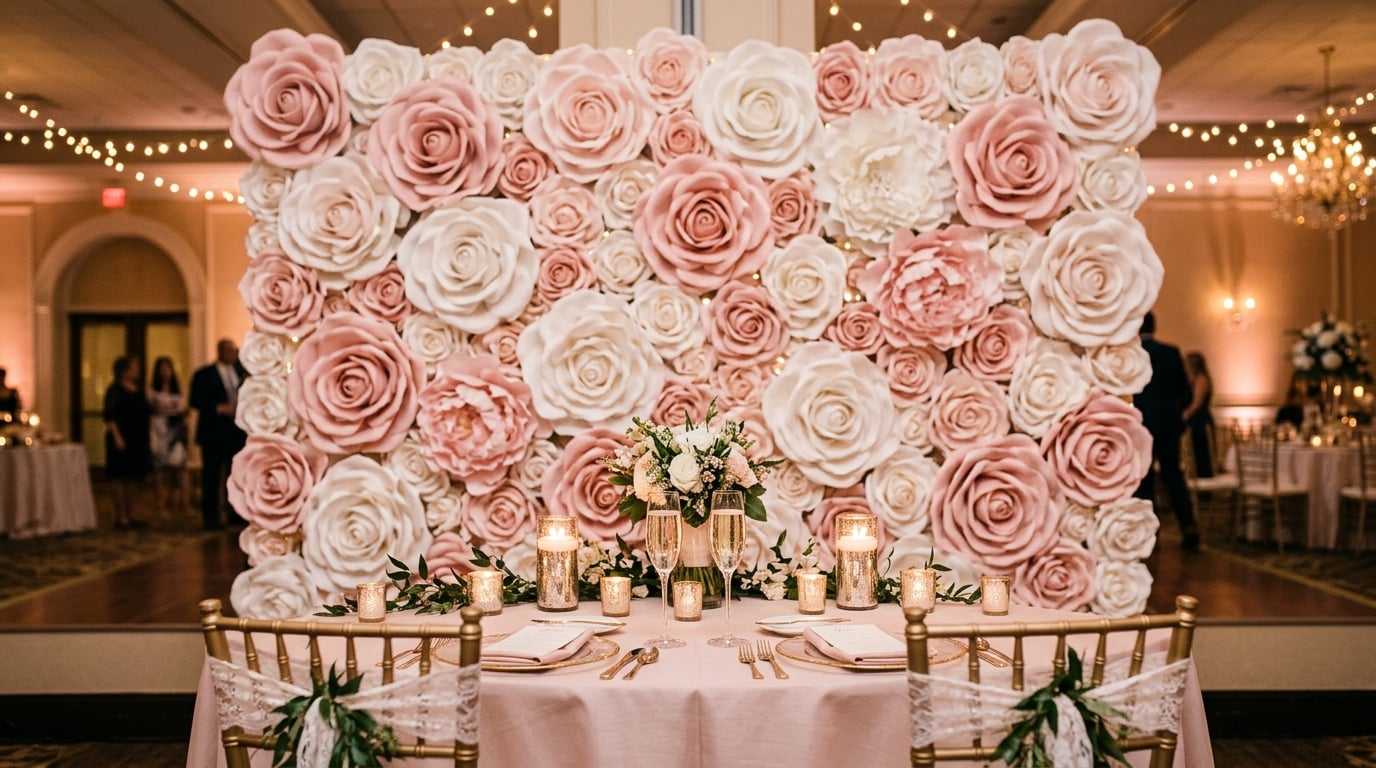
A large paper flower wall for photo booth use does that better than most installations because it works before the first picture is taken and long after the event ends. Guests see scale, color, and texture from across the room. Then the wall starts doing a second job. It pulls people into a moment they want to share.
A planner usually spots the need fast. The room is booked, the run of show is set, the branding or wedding palette is approved, but the photo area still feels flat. The event has energy, yet nothing is framing it visually.
That’s where a flower wall earns its place.
At weddings, it gives guests a polished place for family photos without forcing a formal portrait line. At retail events, it creates a branded pause point. At birthdays and showers, it turns one corner of the room into the memory hub. The strongest walls don’t feel like craft projects. They feel intentional, scaled for cameras, and designed to draw people in.
One reason these installations took off is that social media changed what people expect from event décor. Around 2015 to 2016, large flower walls became a recognizable milestone in social-media-driven event styling, including a documented 7x7-foot paper flower wall used for a wedding photo booth by Whimsy Design Studio in their paper flower wall project write-up. That moment helped move flower walls from DIY novelty into a repeatable event feature.
A good wall also solves a pain point that planners know well. Guests won’t use a photo area that looks like an afterthought. They will use one that feels immersive.
Where it works best
- Weddings and receptions where you need one dependable backdrop for couples, family groups, and friends.
- Brand activations where color matching and logo-adjacent styling matter more than generic décor.
- Showers and milestone parties when the host wants a high-impact focal point without building an entire set.
- Venue marketing because a strong backdrop makes the event look finished in every shared image.
A flower wall works best when it’s treated as part décor, part guest experience, and part content tool.
If you’re still gathering inspiration, these large paper flower decoration ideas show how oversized blooms can shift from simple wall décor to a true photo moment.
The planning stage is where most flower wall problems get prevented. If the size is wrong, the wall photographs poorly. If the palette is off, it fights the room. If the flower mix is too random, the finished piece looks busy instead of lush.
For photo booth use, size comes first because it controls both guest comfort and the camera frame. A practical benchmark is a 7x7-foot wall (49 square feet) or an 8x8-foot wall (64 square feet), which allows groups of 4 to 6 people to pose comfortably. One documented 8x8-foot design used 285 individual paper flowers, which is a useful model for full event coverage in a large installation, as shown in Jennifer Maker’s paper flower backdrop tutorial.
If you’re planning the layout, ask these questions before choosing a final footprint:
A flower wall looks best when it has a clear visual hierarchy. Don’t choose flowers just because they’re pretty. Choose them because each type has a job.
Use a planning checklist like this:
For branded events, keep the palette disciplined. For weddings, tone-on-tone usually photographs better than using every accent color in the invitation suite. For playful parties, bolder contrast can work, but only if one hue remains dominant.
Practical rule: Pick one hero color, one support color, and one neutral or foliage tone. That keeps the wall dimensional without turning it chaotic.
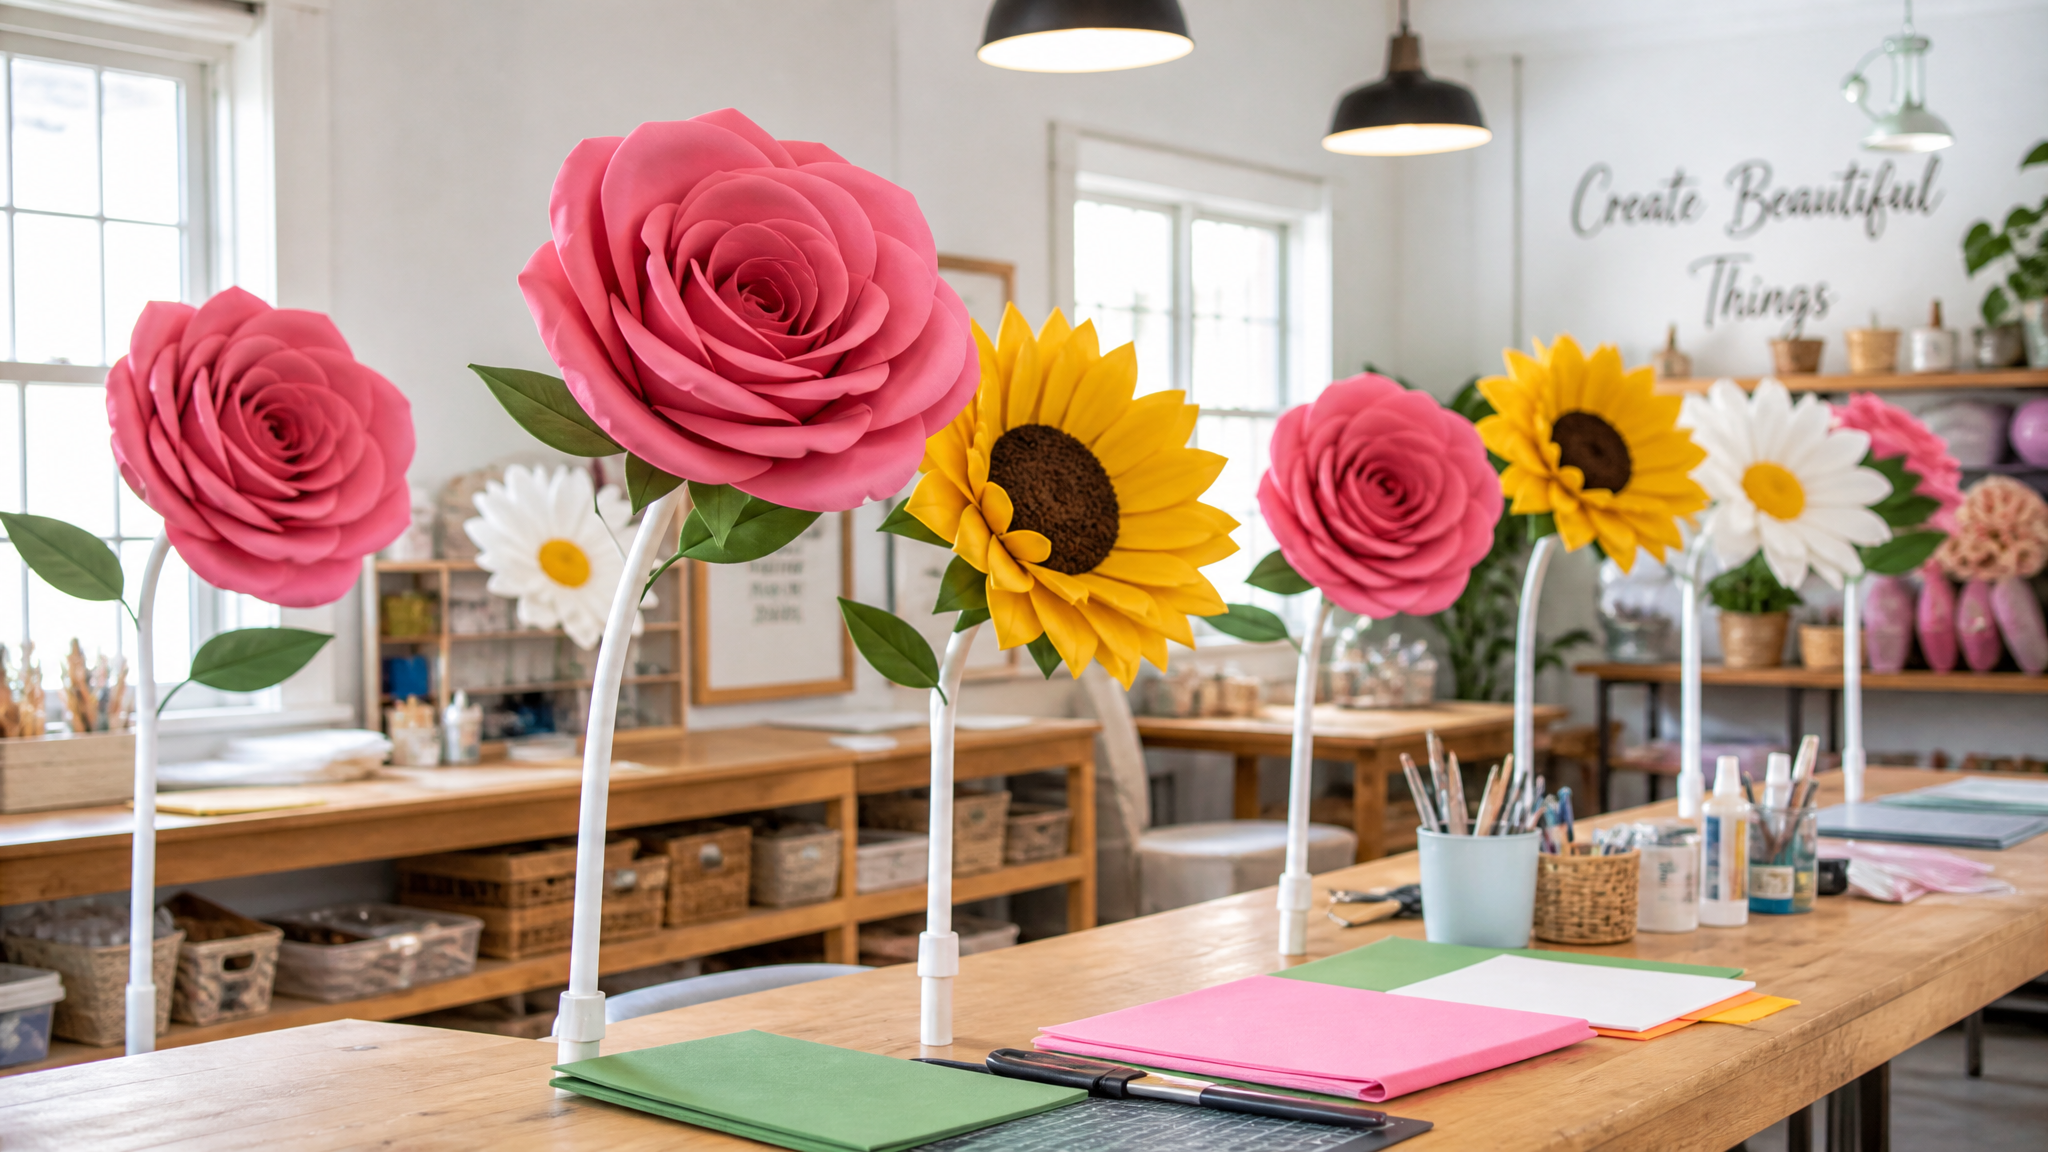
Style affects the way people interact with the backdrop. Soft rounded roses feel romantic. Sunflowers feel cheerful and informal. Ranunculus-style petals read more detailed on camera. Large open blooms create drama fast, while a dense garden mix feels more immersive.
This is also the point to compare your inspiration with reality. Intricate petal styles are beautiful, but they increase labor. Layered monochrome walls are elegant, but they need strong lighting to show texture. If you need ideas for bloom styles and event-ready scale, these large decorative paper flowers are a useful reference point.
The wrong build path causes more stress than the wall itself. Some projects should be fully DIY. Some should start with a kit. Some should be handed off to a custom maker because the timeline, finish level, or brand requirements leave no room for experimentation.
A flower wall can still be a smart alternative to a traditional booth setup. Based on 2018 WeddingWire discussions, flower walls can offer 50 to 70 percent cost savings over traditional photo booth rentals, and a skilled crafter may spend 40 to 60 hours on a large DIY wall, as summarized in Lovely Indeed’s coverage of photo booth flower wall cost and effort considerations.
DIY works when you have time, workspace, patience, and someone detail-oriented handling production. It’s a good fit for showers, birthdays, smaller weddings, and styled shoots where labor is part of the project.
DIY is not ideal when:
Kits reduce the biggest DIY pain points. You spend less time figuring out quantities, petal patterns, flower sizing, and structural materials. That matters when the team is already juggling signage, rentals, staffing, and guest flow.
A good kit also helps with consistency. The finished wall looks more cohesive because the flowers are designed to work together rather than assembled from mixed tutorials and impulse purchases.
Custom is the strongest choice when the wall needs to do more than look pretty. It may need to match a campaign palette, fit an unusual footprint, travel, install quickly, or hold up across multiple activations.
For planners weighing alternatives, this overview of flower wall backdrop rental considerations helps clarify where rental, kit, and custom options differ in practice.
If the event cannot absorb mistakes, choose the path with the fewest variables, not the lowest material cost.
The cleanest large builds are modular. That’s the difference between a wall that’s manageable and a wall that becomes a transport nightmare.
For an 8x8-foot wall, one expert method uses 30 foam core panels measuring 20x16 inches, joined with packing tape. Full coverage can require over 200 individual flower pieces and greenery fillers, and a professional can assemble the wall in 4 to 6 hours, based on the build process documented by Jennifer Maker. Since that source is already linked above, I’m using the method here without repeating the link.
Build the base first
Your structure should be lightweight, repairable, and easy to break down.
Use this sequence:
If the wall may go outdoors or into a high-traffic space, reinforce the back more than you think you need. Lightweight is good. Flimsy is not.
The fastest way to make a wall look amateur is to spread flowers evenly like wallpaper. Real impact comes from variation in scale and density.
Use a placement strategy like this:
One common mistake is attaching flowers panel by panel with no overall layout. The better approach is to dry-place key blooms across multiple panels first. That way, the composition reads as one wall rather than a stack of decorated rectangles.
Start with the flowers guests will notice first, then solve the empty spaces with smaller elements. Don’t reverse that order.
Treat each panel as part of a larger picture. Finish the structure, rough in the floral map, then go back and refine depth, transitions, and seam coverage.
Helpful shop-floor habits:
If you’re making your own blooms, these large paper flower construction ideas can help you think through petal shaping and assembly before you commit to a full wall.
What works
What doesn’t
The most polished walls aren’t always the densest. They’re the ones where scale, spacing, and structure were handled in the right order.
Install day is where even a beautiful build can go sideways. A large paper flower wall for photo booth use has to do more than look good in your workspace. It has to survive transport, venue quirks, setup pressure, and guest traffic.
For venue walls, 3M Command Strips are a reliable option on painted drywall. For lightweight tissue paper flowers, double-sided masking tape loops or Glue Dots offer a 92 percent chance of no-residue removal, with testing recommended first, according to Oh Happy Day’s giant flower photobooth backdrop DIY guide.
Don’t decide your mounting approach in the studio. Confirm it with the venue.
Here’s the simple breakdown:
- Painted drywall often works well with removable strips if the wall is smooth and clean.
- Delicate surfaces need caution. Always test in an unseen area first if the venue allows it.
- Open floor plans usually call for a freestanding support structure.
- Outdoor locations need anchoring, not optimism.
If the event is outdoors, even a light breeze can turn petals and panels into a problem. Add rear support, ballast, or structural anchoring before you decorate the front. Fixing movement after the wall is fully dressed is much harder.
A smooth install depends on the backup supplies you bring.
Your event-day kit should include:
The install kit saves the wall. The wall rarely saves itself.
Do one slow pass before opening the photo area:
Most mounting failures come from rushing the last ten percent. Give yourself enough time to test, adjust, and photograph the setup before guests touch it.
A strong wall can still photograph badly. Consequently, many planners lose the payoff. They invest in petals, color matching, and installation, then let overhead venue lighting flatten the whole piece.
The return isn’t just visual. Engagement matters. Custom branded walls can generate 3x more user-generated content, and some wedding planners report a 15 to 20 percent booking uplift from viral backdrops, as discussed in Popshop America’s article on giant paper flower tutorials and shareable display ideas.
Paper flowers need directional softness. Flat direct flash tends to erase the shape you worked so hard to build.
A simple setup that works:
If your team wants a solid refresher on understanding key event photography principles, that guide is useful because it connects lighting, timing, and guest movement in a practical way.
Guests often need small prompts. If you let everyone stand flat against the wall, the photos will all look the same.
Try this approach:
For more inspiration on backdrop styling that works specifically for guest photos, these best photo booth backdrop ideas are worth reviewing.
Good lighting turns a decorative wall into a usable photo asset. Without it, you’ve built scenery. With it, you’ve built content.


Your Flower Wall Project FAQs
The wall is built, the install plan is set, and the event is close. This is when the practical questions show up.
Transport modular sections whenever possible. Flat panels are easier to move than one oversized build, and they’re easier to protect with clean sheets, foam wrap, or lightweight dividers.
Keep heavy items off the floral face. Stand panels upright when that’s safer for the flower depth, and secure them so they can’t slide during turns or stops.
Store panels in a dry, clean space away from moisture and direct sunlight. Dust is easier to prevent than remove, so cover the sections loosely rather than sealing them in something that traps pressure against the petals.
If the flowers are detachable, label the layout before takedown. Reinstall goes much faster when you know which cluster belongs where.
Start earlier than your first instinct. Large walls take more time than people expect because production includes planning, petal cutting, shaping, assembly, test layout, repairs, packing, transport, and installation.
If your event week is already full, a kit or custom route usually creates less stress than trying to force a large scratch build into the final days.
Can I reuse the same wall for multiple event types
Yes, if you design with reuse in mind. Neutral base florals adapt well. Removable signage, themed props, or branded overlays can change the look without rebuilding the floral structure.
This works especially well for venues, agencies, and retail teams that need the same wall to serve different audiences.
Ask for venue approval in writing before install day. Some spaces won’t allow direct wall mounting, which means you’ll need a freestanding frame or another support method.
Bring photos of the structure and the mounting plan. Venue teams are much more comfortable approving setups they can understand quickly.
Lighting is usually the fastest fix. If you’re refining the setup for repeat use, Snapbar’s guide to Mastering Lighting for Photo Booths is a practical resource for dialing in a more flattering booth setup.
The biggest lesson across all of this is simple. The wall itself is only part of the project. Planning, transport, installation, and photography are what make the investment pay off.
If you want a flower wall that looks polished on camera and works in the actual conditions of live events, Amazing Giant Flowers offers handcrafted oversized floral installations and DIY kits for weddings, activations, retail displays, and photo moments. You can request a custom quote, explore made-to-measure options, or choose a kit that gives you a cleaner path from concept to setup.
Ready to Create Something Amazing?
Browse our collection of giant flower kits and start your next project today.