How to Mix Flower Sizes for a Dynamic Wall Display
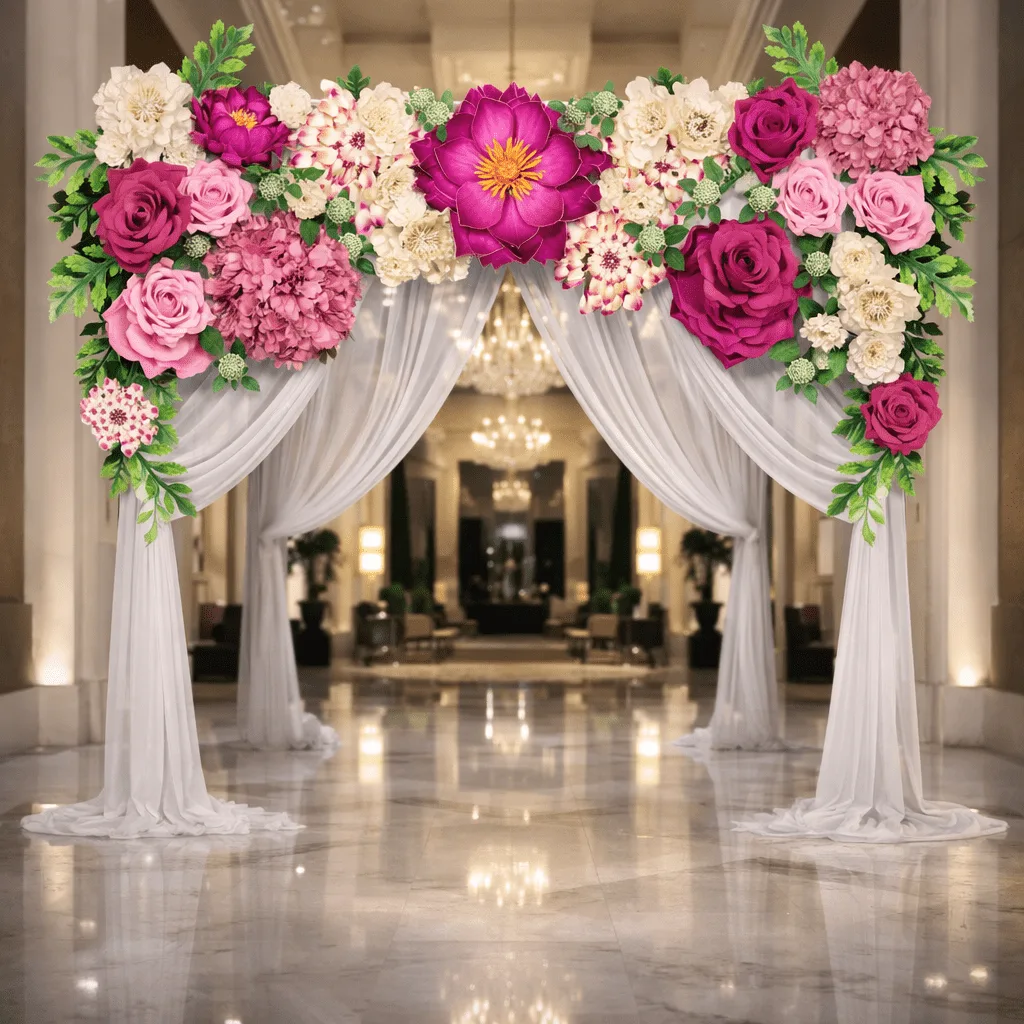
If you've been doing events for a while, you already know that a flat, same-size flower wall feels... flat. Literally. When you mix giant flower sizes on a wall, something magical happens — the display gets depth, movement, and that "wow, who did this?" factor that clients remember long after the event is over.
I learned this the hard way early on. I put together a wall of all 24" flowers once — perfectly spaced, perfectly uniform — and it looked fine. Fine. Not amazing. Not shareable. Just fine. That was the last time I did that.
So if you're an event pro looking to level up your wall displays, this is the guide I wish I had back then. We're talking real technique, specific sizes, layout strategy, and all the little decisions that turn a good backdrop into a great one.
Key Takeaways
Here's the thing about the human eye — it doesn't like boredom. When everything is the same size, the eye has nowhere to travel. It scans, gets bored, and moves on.
But when you mix sizes? The eye bounces. It finds a big 30" bloom, moves to a cluster of 18"s, discovers a 24" tucked in between. That journey is what makes people stop, stare, and pull out their phone.
For event pros, this is everything. Your backdrop isn't just decoration — it's a photo opportunity, a brand moment, a memory-maker. A dynamic wall gets photographed more, shared more, and talked about more. That's your marketing working for you long after the event ends.
A flat wall of same-size flowers looks like wallpaper. A mixed wall looks like art.
Understanding Your Size Options: The 18", 24", and 30" Breakdown
Our Wall Flower Kits come in three sizes that are specifically designed to work together: 18", 24", and 30". Each one plays a different role in your display, and once you understand that, the whole layout process clicks.
This is your anchor. Your focal point. The flower that makes someone across the room say "oh wow." Use it sparingly — one or three per display, never scattered randomly. Plant it first, then build everything else around it.
The 30" works especially well centered on a wall, at eye level, or slightly above. If you're doing an asymmetrical layout (which I love for editorial events), put your 30" off-center and let the smaller sizes cascade outward.
The 24" is the flower that does the heavy lifting. It's substantial enough to make an impact but not so large that it competes with your 30". This is your most-used size — think of it as the mid-tone in a painting.
I typically use the most 24" flowers in any given wall display. They fill space beautifully, they're easy to arrange, and they bridge the gap between your big statement blooms and the smaller accent pieces.
Don't underestimate the 18". This size is what gives your wall texture and fills in the gaps without looking forced. Tuck them into corners, cluster them in groups of three, or use them to frame your larger flowers.
The 18" is also your most budget-friendly option at $37.99, which means you can use more of them without blowing your materials budget. Smart event pros stock up on 18"s and use them generously.
💡 Pro Tip
A good starting ratio for a full wall display is roughly 1 large (30") : 3 medium (24") : 5 small (18"). This is the Fibonacci approach — it mirrors how flowers actually grow in nature, which is why it feels so visually satisfying.
Ok, this is where it gets really fun. Let me walk you through my actual process — the one I use on real events, not some theoretical grid system.
Before you touch a single flower, photograph or sketch your wall. Note any architectural features — windows, sconces, outlets, awkward corners. These aren't obstacles; they're design cues.
Measure the wall. A 8-foot wide wall needs a different flower count than a 12-foot wide one. I use painter's tape to mark out where my largest flowers will go before I even open a kit.
Put your 30" flowers down first — physically hold them up or use a helper to see how they feel on the wall. Never start with the small flowers. If you do, you'll fill up the space and then have nowhere logical to put your statement pieces.
For a standard 8x8 backdrop, I usually use one or two 30" blooms. For a longer 12-foot wall, three works beautifully — but stagger them, don't line them up in a row at the same height.
Step 3: Fill In With Your 24"s
Now surround your anchors with 24" flowers. Leave some intentional breathing room — not every inch needs to be covered. Negative space is your friend. It makes the flowers that ARE there feel more intentional and luxurious.
Vary the height. Some 24"s go above the 30", some go to the side, some go slightly below. Think of it like a constellation, not a grid.
Now your 18"s go in to fill gaps, add texture, and frame the edges. Cluster them in groups of three rather than placing them individually — it looks more organic and intentional.
The edges of your display are where 18"s really shine. Let them "spill" slightly beyond the main display boundary — it makes the whole thing feel alive rather than boxed in.
This is the step most people skip and it's the most important one. Step back — like, really back, across the room — and look at the whole thing. Take a photo on your phone. What jumps out? What feels heavy or empty?
Adjust before you commit to final mounting. Moving a flower now takes 30 seconds. Moving it after it's fully mounted takes 10 minutes and a small miracle.
🌸 Ready to get started?
Browse our Wall Flower Kits collection — available in 18", 24", and 30" — and start planning your next stunning backdrop.
Size and color are inseparable when it comes to wall design. The way you assign colors to sizes can completely change the mood of the display.
Rich, saturated colors — deep burgundy, navy, forest green — carry visual weight. Put them on your 30" anchors and they'll do exactly what anchors are supposed to do: ground the display and draw the eye. Pale or white tones on your largest flowers can work beautifully too, but they create a softer, more ethereal feel rather than a bold statement.
If you want to explore that soft, romantic look, check out my guide on White Flowers on Wall: A Pro's How-To Guide — it covers exactly how to make all-light palettes feel dimensional rather than washed out.
Resist the urge to alternate colors in a predictable pattern. ABAB color arrangements look like a checkerboard, not a garden. Instead, think of your colors as pools that flow into each other — cluster similar shades together and let them blend at the edges.
For event pros working with brand colors, this is especially important. A corporate client's teal and gold shouldn't be evenly distributed — let the teal dominate in one area and the gold accent in another, with the sizes creating the visual interest rather than the color contrast doing all the work.
Size Mix Comparison: Which Layout Works for Which Event?
Not every event calls for the same approach. Here's how I think about sizing strategy based on the type of event I'm doing.
Want to go deeper on any of these event types? I've written full guides on Quinceañera backdrop ideas, baby shower backdrops, and graduation party backdrops — each one breaks down the size and color strategy specific to that event style.
A great layout falls apart if the mounting is sloppy. Here's what I've learned after doing this for years.
💡 Pro Tip
If you're working with EVA foam flowers, you have more flexibility to shape and angle petals than you do with paper. Check out our EVA foam collection — the material holds a curve beautifully, which means your 30" anchor flowers can have real sculptural presence on the wall. For technique, my guide on heat gun techniques for shaping foam flower petals is a must-read.
Sometimes a wall alone isn't enough — especially for larger venues or when you want to create a full immersive environment. That's when I bring in freestanding flower kits to extend the display into the room.
A wall of mixed 18"-30" flowers paired with a couple of freestanding 30" blooms on either side creates a cohesive, enveloping environment that feels like a full installation rather than just a backdrop. It's the difference between a pretty wall and an experience.
For a deeper dive into combining wall and freestanding elements, my guide on freestanding giant flower arrangements for events walks through exactly how to integrate both for maximum impact.
The best backdrops don't just sit on the wall — they reach into the room and pull people in.
Frequently Asked Questions
Ready to Create Something Amazing?
Browse our collection of giant flower kits and start your next project today.