How to Build a Giant Sunflower Kit Step by Step
Planning a party and want something that stops people in their tracks the moment they walk in? I get it. I've been there — staring at a blank venue wondering how to make the space feel like something. That's exactly why I fell in love with building a giant sunflower kit for events. There's nothing quite like a five-foot sunflower standing tall at your entrance, your dessert table, or your photo spot to make guests go "wait, did you MAKE that?!"
And yes — you absolutely can make it. Even if you've never crafted a day in your life.
Our Freestanding Giant Flower Kits come with pre-cut EVA foam pieces and step-by-step video tutorials, so you're not starting from scratch or guessing your way through it. This guide is going to walk you through everything — from unboxing to final setup — so your party looks absolutely stunning without you losing your mind in the process.
Key Takeaways
Before we get into building, let me show you what you're working with. Because honestly, the first time I opened one of these kits, I was kind of amazed at how much thought goes into the pre-cutting.
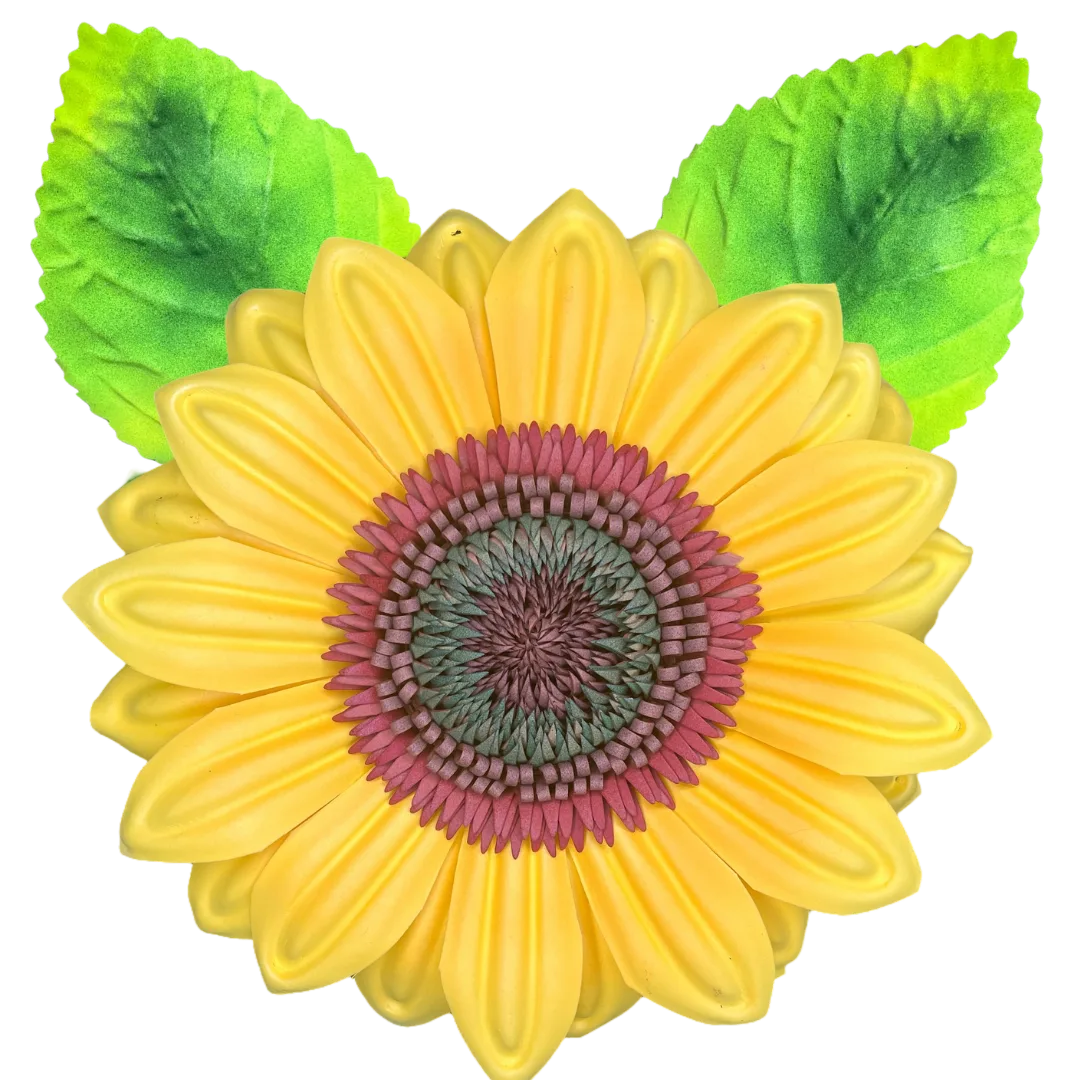
Every kit includes pre-cut EVA foam petals — both the large outer petals and the smaller inner layer that gives the flower that beautiful dimensional look. You'll also get a foam center disc (the dark brown sunflower center), and depending on the kit, a bendable pipe stem that lets you angle the flower head however you want.
The EVA foam is the real hero here. It's lightweight, flexible, and holds paint beautifully. It's also forgiving — if a petal doesn't look quite right, you can reshape it with a heat gun or just tuck it behind another one. Nobody will know.
Tools You'll Want to Have Ready
The kit handles the hard part, but you'll want to grab a few things before you sit down to build:
If you're new to working with foam, I'd really recommend reading Heat Gun Techniques: Shaping Foam Flower Petals Like a Pro before you start. It changed the way I build flowers completely.
Ok, this is where it gets really fun. Let me walk you through the full build, the way I'd explain it to a friend sitting at my craft table.
I know it's tempting to glue everything together and then paint. Don't do it. Paint your petals while they're flat and individual — it's so much easier to get into all the edges, and you can add shading and depth without fighting awkward angles.
For a sunflower, I use a base coat of bright golden yellow, then while it's still slightly tacky I dry-brush some burnt orange toward the base of each petal. That gradient effect is what makes it look real instead of craft-store-flat. Check out Your Guide to Flawless Foam Board Paint Finishes for more painting tips that apply perfectly here.
Once your paint is dry, this is where the magic happens. Use your heat gun on low, hold it about 3–4 inches from the petal, and gently curl the tip back. Hold the shape for about 10 seconds while it cools and it'll stay exactly where you put it.
Some petals I curl forward, some back, some I twist slightly at the tip. Real sunflowers aren't perfectly symmetrical and neither should yours be. That's what makes it look gorgeous.
Your foam center disc gets painted in dark chocolate brown, then I love to add texture. You can press a crumpled piece of aluminum foil into the wet paint to create that bumpy seed-like texture real sunflowers have. Let it dry completely before moving on.
Some party hosts add a light dusting of gold or bronze glitter over the center while the paint is still wet. Honestly? It looks incredible under party lights.
💡 Pro Tip
Build your flower center on a flat surface and let it cure for at least 30 minutes before attaching petals. Hot glue on foam needs time to really bond, especially on the heavier center piece. Rushing this step is the #1 reason petals fall off mid-party.
Start with your large outer petals. Lay your center disc face-down on your work surface. Apply a generous line of hot glue along the base of each petal and press it firmly against the back edge of the center disc. Work in a circle, spacing petals evenly.
Pro move: alternate the angle of each petal slightly — some pointing more left, some more right. It gives the flower a full, natural look instead of a pinwheel effect.
Once your outer layer is set, add the smaller inner petals in the gaps between the outer ones. These should sit slightly higher and closer to the center. This layering is what creates that gorgeous depth that makes people think you hired a professional florist.
This is where your bendable pipe comes in. The pipe slides into the back of the flower assembly and gets secured with hot glue and, for extra stability, a few wraps of floral tape or even duct tape on the back (it's hidden anyway). The bendable pipe lets you tilt the flower head at whatever angle looks best for your setup — slightly drooping for a natural look, or facing straight forward for maximum photo impact.
The kit includes everything you need to make your flower stand on its own. Slide the stem into the base, and if your venue has hard floors, I always recommend a small sandbag or a heavy decorative pot at the base for extra security — especially if there are kids or wind involved. For outdoor parties, you can push the base stake directly into grass or soft ground.
At 5 feet tall, these flowers are genuinely impressive. But if your venue has lower ceilings or you want a tabletop version, just trim the stem down. Takes about two minutes with a pipe cutter or strong scissors.
Customizing Your Giant Sunflower Kit for Any Party Theme
Here's the thing — sunflowers are incredibly versatile. I've seen them styled for rustic barn weddings, tropical luau parties, Boho baby showers, and even elegant black-and-gold galas. The base flower is the same; it's all in how you finish it.
EVA foam takes paint so beautifully that you're really only limited by your imagination. And if you want to go deeper on painting techniques, A Crafter's Guide To Painting On Foam Core has some really solid advice that translates directly to foam flowers.
For even more backdrop inspiration, check out DIY Giant Flower Backdrop for Photos: Easy Guide — it pairs perfectly with freestanding flowers.
🌸 Ready to build your own?
Browse our full Freestanding Giant Flower Kits collection — sunflowers, roses, dahlias, and more, all pre-cut and ready for your next party.
Real talk? I've tried every method. Paper flowers, fabric flowers, fresh flowers, balloon flowers. Let me save you some time with this honest comparison.
The EVA foam kit wins for party hosts specifically because you can reuse it. I know hosts who've used the same flowers for a birthday, then a graduation party, then a baby shower — just repainted between events. That's incredible value.
Building the flower is one thing. Setting it up so it actually looks intentional and professional is a whole other skill. Here's what I've learned from doing this over and over again.
At full 5-foot height, your sunflower commands attention. Place it where eyes naturally go first — the entrance, behind the main table, or at the focal point of your photo area. Don't tuck it in a corner where it gets lost.
If you're using multiple flowers, vary the heights. Cut one stem to 5 feet, one to 4 feet, one to 3.5 feet. Group them in odd numbers (3 or 5 looks most natural). This is the single biggest thing that makes a DIY setup look like it was styled by a pro.
Giant sunflowers look incredible paired with our wall flower kits for a layered backdrop effect. Put the wall flowers behind and the freestanding ones in front — the depth is breathtaking. I've seen this setup at quinceañeras and it genuinely looks like a magazine shoot.
For more inspiration on combining freestanding flowers with other event decor, Freestanding Giant Flower Arrangements for Events: Complete Guide goes deep on this.
Frequently Asked Questions
How long does it take
Ready to Create Something Amazing?
Browse our collection of giant flower kits and start your next project today.