Giant Bird of Paradise: Tropical Statement Piece Tutorial
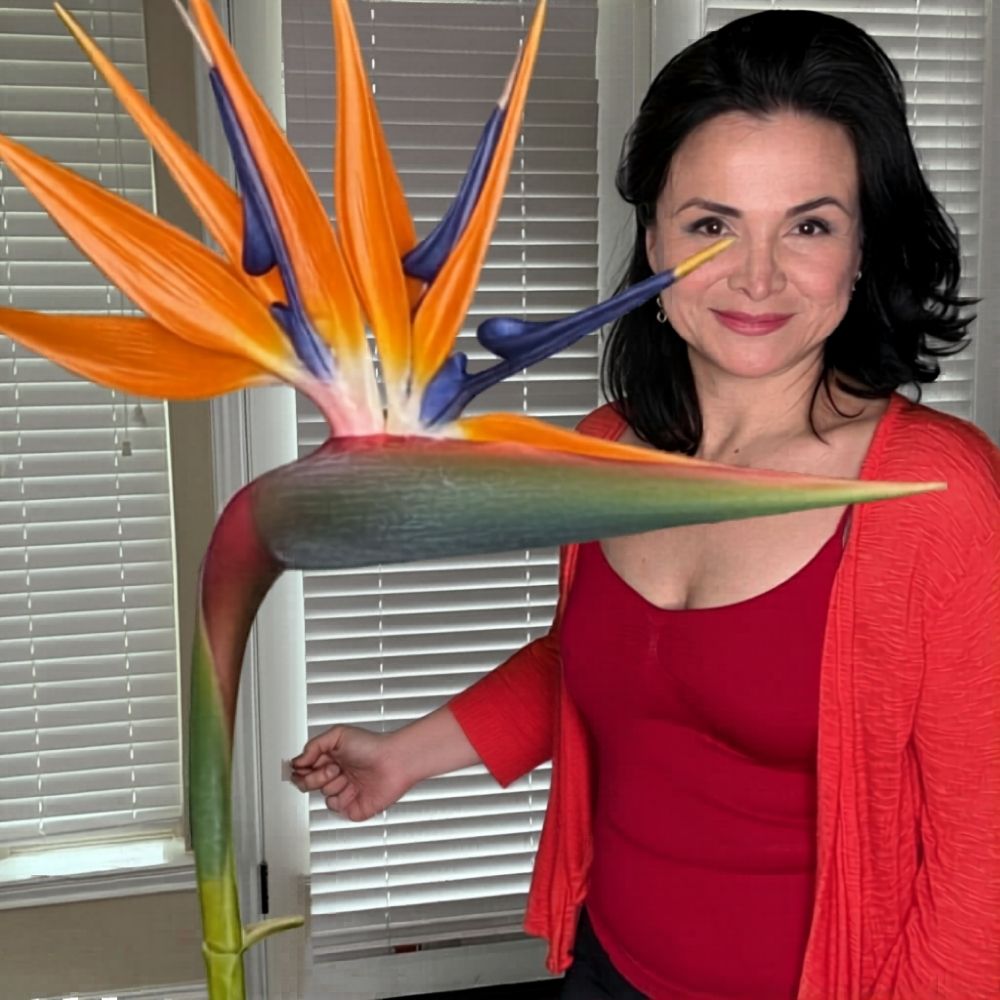
If you've been dreaming about a giant bird of paradise foam flower that actually stops people in their tracks — the kind that makes guests pull out their phones before they even say hello — you're in exactly the right place. I've been making oversized foam flowers for years, and I'll tell you honestly: the bird of paradise is one of my absolute favorites to build. It's dramatic, it's architectural, and it looks like it belongs in a luxury resort lobby.
This tutorial is going to walk you through everything. We're talking materials, petal shaping, that iconic spiky silhouette, color choices, and how to get it standing tall without it flopping over by hour two of your event. Whether you're a DIY bride, an event planner, or just someone who wants something absolutely wild on their wall — this one's for you.
Grab your coffee. Let's build something gorgeous.
Tropical aesthetics are everywhere right now, and not in a cheesy tiki-bar way. We're talking sophisticated, editorial-level tropical — deep teals, burnt oranges, lush greens layered together in ways that feel both wild and intentional.
According to The Knot's annual wedding trend report, botanical and tropical themes have been climbing the charts consistently, with couples increasingly choosing bold, nature-inspired installations over traditional florals.
And honestly? Fresh bird of paradise arrangements are not cheap. A Brides.com survey found couples spend an average of $2,000–$2,500 on wedding flowers — and a single fresh bird of paradise stem can run $8–$15 at wholesale. For a statement installation, you'd need dozens.
That's where foam changes everything. A freestanding giant foam version can stand 3 to 5 feet tall, costs a fraction of fresh florals, and lasts indefinitely. I've had clients use the same pieces for multiple events over two years.
The bird of paradise shape is also uniquely forgiving in foam. Those angular, blade-like petals? EVA foam holds that geometry beautifully. You don't need to fight the material — it wants to be this flower.
Let me be real with you: the materials list matters more than almost anything else here. I learned this the hard way — early on I tried to cut corners with thinner foam and the petals just... wilted. Not the look we're going for.
Here's exactly what I use and recommend:
If you'd rather skip the cutting entirely, our pre-cut Giant Flower Kits come with every petal already shaped and sized — just heat, paint, and assemble. Starting at around $80 for a single freestanding kit.
For a full tropical installation, our Bundle Kits (8–12 flowers, $350–$600) are honestly the move. Mix bird of paradise with oversized monstera leaves and hibiscus blooms and you've got something that looks like it cost five times the price.
Step-by-Step: Building the Giant Bird of Paradise Foam Flower
Ok, this is where it gets really fun. I'm going to walk you through this like we're sitting at my craft table together, because that's genuinely how I'd want someone to teach me.
A real bird of paradise has a very specific anatomy. You've got the spathe — that long, boat-shaped green bract that everything emerges from — and then the petals themselves, which are a combination of orange sepals and a blue-purple tongue.
For a 4-foot finished flower, here are the cuts you need:
If you're using a craft knife, go slow and use a metal ruler for the straight edges. Jagged cuts show up after painting, and you'll be annoyed at yourself. Ask me how I know.
This step is what separates a flat, craft-fair-looking flower from something that genuinely looks sculptural and alive. Heat shaping is everything.
Set your heat gun to medium heat. Hold each orange sepal about 3–4 inches from the nozzle and move it in slow, sweeping passes. You'll feel the foam soften — that's your window.
For the orange sepals: cup them slightly lengthwise and then curve the tip backward, away from you. Think of how a real bird of paradise petal arches — it has this confident backward sweep.
For the spathe: curve it into a gentle U-shape along its length, like a canoe. This is what gives the whole flower that open, reaching gesture.
For the blue tongue: keep it mostly flat but add a very slight lengthwise curve. It should look taut and pointed, like it's reaching forward.
Work quickly once the foam softens, and hold each piece in position for about 20–30 seconds while it cools. EVA foam has memory — it'll hold whatever shape you give it once it cools completely.
Here's my honest opinion: single-color foam flowers look flat. The magic is in the layering. Even if you're not a painter, you can do this — I promise.
For the orange sepals, start with a base coat of deep burnt orange. Let it dry fully (about 20 minutes with matte acrylic). Then dry-brush — meaning barely any paint on your brush — with bright yellow-orange along the raised center ridge and tips. Finally, add a whisper of deep red at the very base where the petal meets the spathe.
For the spathe, use deep forest green as your base. Dry-brush chartreuse green along the edges and the raised center line. A tiny touch of dark teal at the pointed tips adds that slightly waxy, tropical-leaf quality.
The blue tongue gets a base of deep cobalt blue, then a dry-brush of bright teal down the center. The effect should look almost iridescent. According to HGTV's color theory guides, layering analogous colors (blues and teals) creates visual depth that reads as more realistic to the eye.
Let everything dry completely before you move to assembly. I usually do painting the night before and assembly the next morning. Rushing this step is the number one mistake I see beginners make.
Assembly for a bird of paradise is a little different from a round peony or rose. The whole design is asymmetrical and directional — it should look like it's reaching toward light, not sitting flat and centered.
Start with your spathe. If you're making a freestanding piece, hot-glue your bendable pipe stem along the underside of the spathe's center line, leaving about 10–12 inches of stem extending below the base. This is what goes into your base or pot.
Next, glue the orange sepals inside the spathe, fanning them upward and outward. Don't make them perfectly symmetrical — real bird of paradise blooms have a slightly wild, uneven quality. Offset the three sepals slightly so they emerge at different heights.
Tuck the blue tongue petal between the sepals, angling it forward. Then nestle the two small yellow accents at its base. A small bead of hot glue holds everything in place.
For the base, I love using a terracotta pot filled with floral foam or sand. Push the stem down into it firmly. For extra stability with a 5-foot version, add some decorative rocks on top of the floral foam — it keeps the center of gravity low and the flower won't tip even if someone bumps the table.
If you're going wall-mounted instead, our Wall-Mounted Kits (starting at $50) include the hardware you need. The bird of paradise looks absolutely stunning mounted at a slight upward angle — like it's growing right out of the wall.
Planning a full tropical backdrop? I'd love for you to check out my tutorial on DIY giant flower backdrops for photos — it pairs perfectly with this project. And if you're building this for a wedding specifically, my guide to giant foam flowers for wedding arches has everything you need for a cohesive tropical arch design.
According to Statista, the global DIY crafts market is projected to reach $51.6 billion by 2027 — and event décor is one of the fastest-growing segments within it. More people are choosing to make their own statement pieces because the results genuinely rival (and often surpass) what you'd get from a florist.
For event planners building inventory: a single giant bird of paradise foam flower can be rented out or reused across dozens of events. At WeddingWire's estimated floral rates, even a modest tropical centerpiece installation runs $300–$600 for a single event. Your foam version pays for itself after one or two uses.
If you're styling a retail space or boutique with this, I have a whole post on visual merchandising ideas for boutiques that talks about how oversized botanicals drive foot traffic and social sharing — real numbers, real examples.
And for anyone building this for a quinceañera, graduation party, or baby shower — tropical themes work beautifully for all of them. I've got dedicated guides for quinceañera backdrops, graduation party backdrops, and baby shower backdrops if you want to build out a full coordinated setup.
One more thing I want to mention: scale matters more than you think. A 2-foot bird of paradise reads as "cute craft project." A 4–5 foot version reads as "professional installation." Don't be afraid to go big. According to Martha Stewart Weddings, oversized floral installations are consistently cited as the most-photographed elements at events — and that's exactly what you want if you're creating something for a client or for your own celebration.
The whole build — from cutting to final assembly — takes most people about 3–4 hours for their first bird of paradise. By your second or third, you'll be down to under two hours. The learning curve is real but it's short, and the payoff is huge.
If you want to see how this flower pairs with other large statement pieces, my post on large floral arrangement ideas for stunning displays has some combinations I'm really proud of — including a full tropical jungle installation that used bird of paradise as the focal point surrounded by oversized monstera and heliconia.
You've got this. Seriously. The bird of paradise looks complicated but it's actually one of the more forgiving builds because the whole aesthetic is dramatic and slightly wild — small imperfections just add to the character.
Head over to the Amazing Giant Flowers shop to grab your foam sheets, bendable stems, or a full pre-cut kit if you want to skip straight to the fun part. And if you build one, I genuinely want to see it — drop a photo in the comments or tag us. What event are you making this for?
Ready to Create Something Amazing?
Browse our collection of giant flower kits and start your next project.
Shop All Flowers